FAQ / TROUBLESHOOTING
FAQ
Yes, you can use FarPlay entirely for free. Simply download the FarPlay app, start a session, share your session ID with the other participant, and start playing. No account or subscription is needed. Note that the FarPlay Free mode won’t support more than two participants, and there is a limit of 45 minutes per session.
No, you can use FarPlay in FarPlay Free mode without creating an account or registering. To access premium FarPlay features such as unlimited session length, multi-user sessions, and multi-track recording, you’ll need a FarPlay subscription.
Yes. Like other communication software, FarPlay requires a dedicated app. All participants in a session should download the latest version of FarPlay from farplay.io/download.
Not yet. As of May 2023, we don’t yet have a mobile version of FarPlay, although we intend to develop one in the future.
No, only the person initiating the session needs to have a subscription in order for the session to have premium features like multi-user capability and unlimited session length. Other participants don’t need to have a subscription.
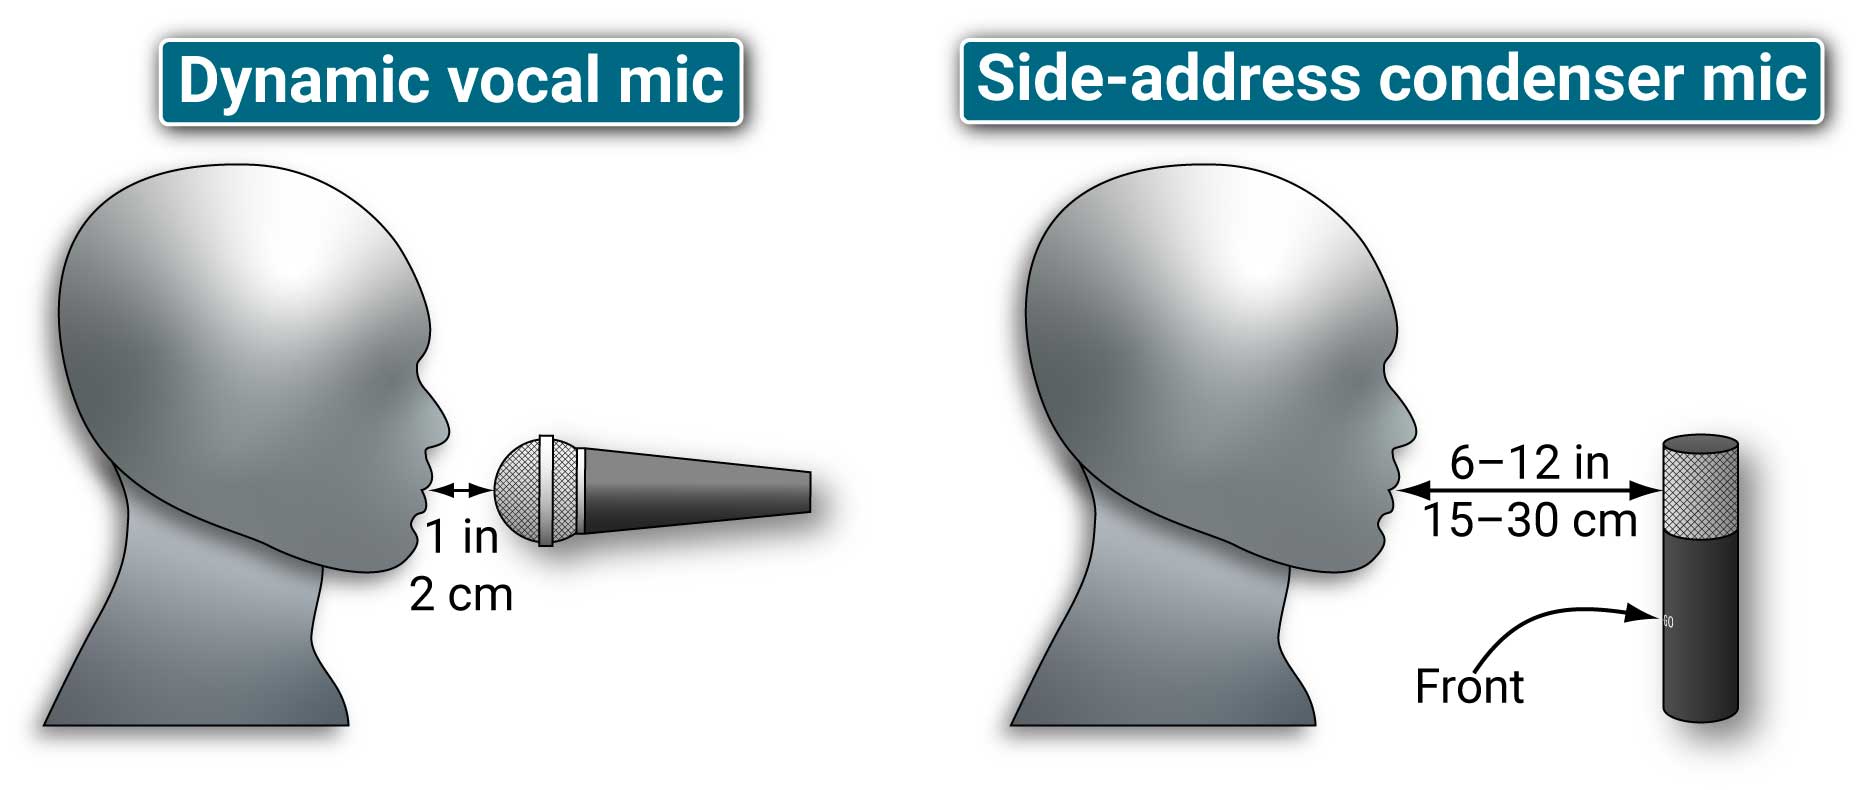
FarPlay aims to deliver studio-quality sound between users with the absolute smallest possible delay. In order to achieve this, we do not do echo-cancellation, a process that alters incoming audio and also increases latency. Hence, FarPlay users will hear an echo of their own sound if headphones are not being used, as the sound coming out of the speakers feeds back into the microphone. There are exceptions to this rule: if, for example, you are using a directional microphone as your input and your speakers are distant from the microphone, the feedback may be minimized to the point of being functionally inaudible. Also, if you’re not using a microphone for your input (for example, an electric guitar with a pickup, or a digital keyboard), then feel free to not use headphones.
Zoom and other videoconferencing apps buffer and compress. This allows them to work with even very basic internet connections, but these processes degrade the sound and greatly increase latency. FarPlay aims to make you feel like you’re in the same room as the people you’re connecting with, and as such, we send studio-quality sound and we limit our buffering to the absolute minimum. This puts higher demands on your internet connection.
Troubleshooting
FarPlay crashes
- Check that macOS is up to date. (This fixes a rare situation where using the Nikon Webcam Utility on an older version of macOS causes FarPlay to crash).
- Run this installer from Microsoft to update out-of-date components of Windows.
- If Microsoft’s installer above doesn’t fix the problem, open FarPlay, but before entering a session, go to Preferences > General Options and set the Audio Buffer Size to 480 (10 ms).
Latency is too high
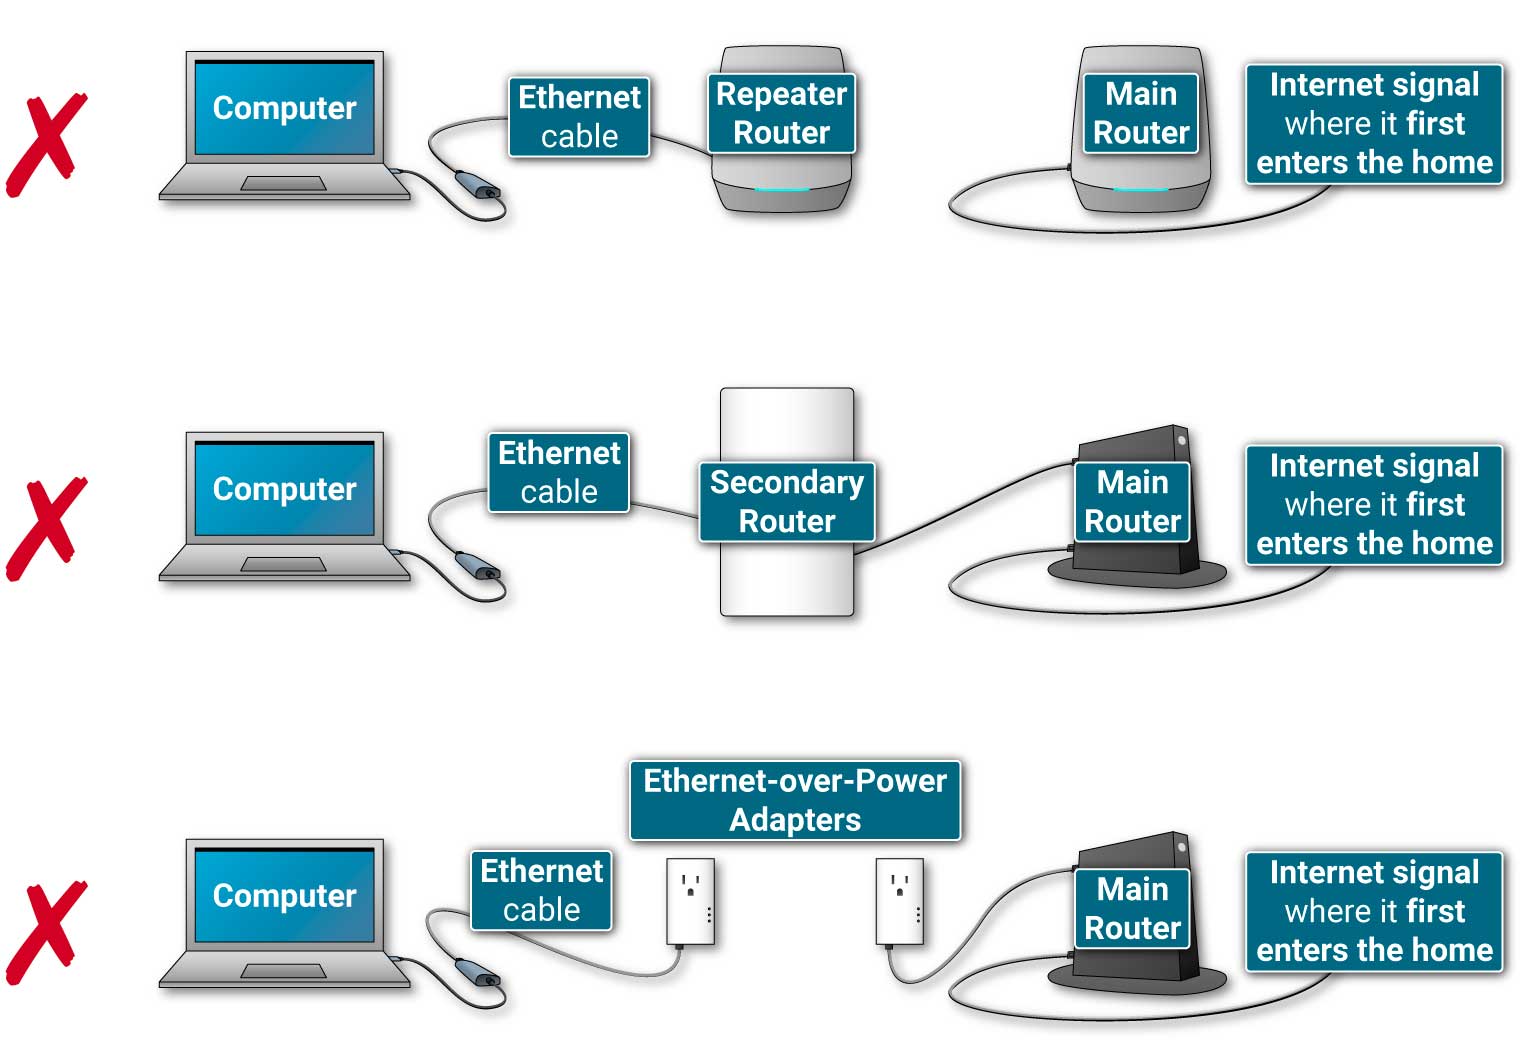
If you have too much latency, try the suggestions in Part 1 first. If latency is still too high, try suggestions from Part 2, etc.- Make sure each participant’s computer is connected directly by Ethernet to the main router. The main router is the router that is directly connected to the outside internet (could be fiber, cable, or satellite internet) — the main router receives the internet signal at the point where it enters your home.
 Don’t use a wireless extender/repeater router, secondary router (like an Apple Time Capsule), or Ethernet-over-power adapter (like a Powerline adapter). A repeater/extender router repeats the signal from your main router.
 Ethernet cables can be up to 300-feet long without signal degradation. If your computer doesn’t have an Ethernet port, you’ll need a USB-C-to-Ethernet adapter or a USB-A-to-Ethernet adapter.
 - Turn Wi-Fi off.
- Turn VPN off, if used (see video tutorial).
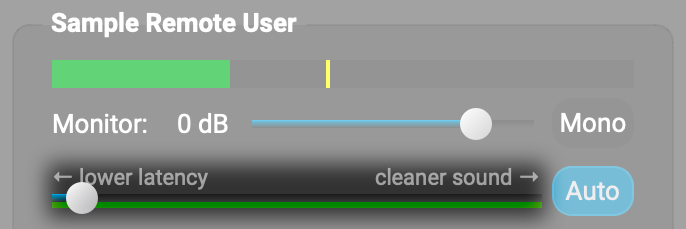
- Drag the latency slider as far to the left as you can without unacceptably increasing the amount of crackling. Click to turn Auto off. (Watch our video tutorial).

- Upgrade to fiber internet. If fiber internet is not available, upgrade to cable internet (business cable is better than residential cable).
- If you can get fiber or cable internet, skip this bullet point. If DSL is the only landline internet connection available, ask the phone company to test whether your phone line supports turning interleaving off. If landline internet isn’t available in your area, try Starlink, which might provide better latency than fixed residential wireless internet.
- We recommend having at least 50 Mbit/s of upload speed, if possible.
- Avoid unnecessary home internet use. Don’t use backup apps to live-sync the folder where recordings are being saved. Try pausing syncing completely in DropBox etc. Turn filesharing apps off.
- Turn your home internet’s public Wi-Fi hotspot off. Some internet providers set up your router to serve as a public hotspot people outside your home can use. Turn this feature off using your internet provider’s instructions (see instructions for Xfinity users or for Cox users).
- Turn FarPlay video off or reduce video bandwidth by reducing your max outgoing bandwidth in Video Preferences.
- Have participants switch from sending stereo to sending mono, if possible. Mono uses half as much bandwidth as stereo.
If the suggestions above didn’t lower your latency enough, try one or more of the suggestions below.
- Use the Activity MonitorTask Manager to look for applications with high CPU usage. Quit those applications.
- Make sure your computer is connected to power.
- Turn screen sharing off(especially if you’re using an older Mac).
- Disconnect all unnecessary webcams and uninstall their drivers. (On rare occasion, an incompatible webcam driver or application causes high latency).
If the suggestions above didn’t lower your latency enough, try one or more of the suggestions below.
- Don’t use Bluetooth audio devices.
- If your Mac is from 2016 and later, use an external mic, like the one that comes with a wired set of Apple EarPods. Don’t use the built-in mic, which adds about 30 ms of latency.
- Go to the Windows Sound Control Panel > Recording, double-click on your microphone, go to the Advanced tab, and make sure Windows audio Signal Enhancements are off. For details, go to section 3. Configure and test your audio of our QuickStart instructions customized for you.

- Go to FarPlay’s Preferences > General Options. Raise your audio buffer size to 480 (10 ms). For details, go to section 3. Configure and test your audio of our QuickStart instructions customized for you.

- If you want to reduce latency further, get an audio interface with manufacturer-provided ASIO drivers, like the PreSonus Revelator io44 or PreSonus Revelator USB Condenser Mic.
- Go to FarPlay’s Preferences > General Options tab, choose your audio interface’s ASIO drivers, not its Windows audio drivers, and make your audio interface’s ASIO buffer size small (16, 32, or 64 samples). These steps are illustrated in the QuickStart instructions customized for you.
I hear myself in my headphones
- Remind each participant to wear headphones. Ask each participant to look in FarPlay’s Devices subpanel and make sure the Headphones: pull-down menu is set to their headphones (or the audio device their headphones are plugged into).
 Participants using properly positioned directional mics don’t need to use headphones.
 - Go to Session > Broadcast Output. Click Stop in the Broadcast Output window.
- Ask remote participants using external audio interfaces (including USB mixers) to turn loopback off. For instructions, check out our blog post.
- In the subpanel for “You (…),” drag the monitor slider toward the left (all the way to the left if you want to fully mute your voice in the audio FarPlay sends to your headphones).

- Turn direct monitoring off.
Someone is too quiet or too loud
- Go to Mac Sound Settings, go to the Input tab, click on your microphone, and drag the Input volume slider toward the left. For details, go to section 3. Configure and test your audio of the QuickStart instructions customized for you.

- Go to the Windows Sound Control Panel, go to the Recording tab, double-click on your microphone, go to the Levels tab, and drag the mic level slider to the left. For details, go to section 3. Configure and test your audio of the QuickStart instructions customized for you.

- If you’re using a microphone or audio interface with its own input gain knob, adjust that knob.
- In the FarPlay window, find the subpanel with the name of the participant you can’t hear well. In that subpanel, drag the monitor slider toward the right.

- Raise the general level of your computer audio, outside of FarPlay. This may be done with the audio level keys on your keyboarda knob on your audio interface.
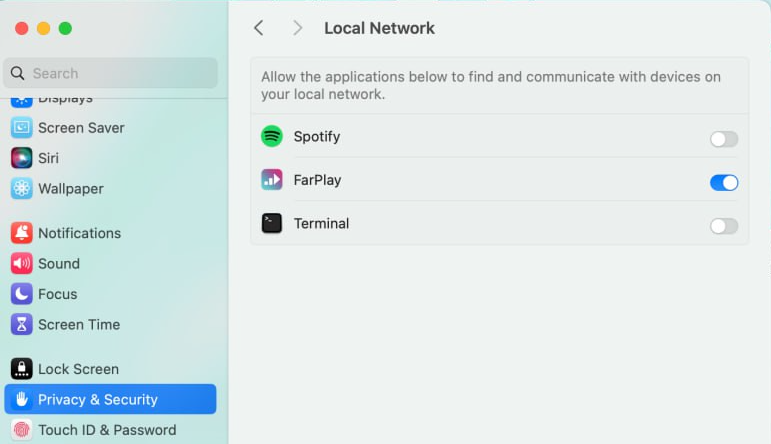
- If you’re not getting any sound input, check Mac mic permissions.
- Make sure you’ve selected the correct device using FarPlay’s Devices > Microphone: pull-down menu.

- Make sure you’ve selected the correct device using FarPlay’s Devices > Microphone: pull-down menu.

- Make sure you’ve turned 48-V phantom power on on your audio interface (applies if your audio interface is connected to a condenser mic or preamp, like a CloudLifter).
- Make sure you’re close enough to your mic.
- If your mic is directional, make sure your mic points toward you.
- Adjust the gain knob on your mic or audio interface.
- Go to Mac Sound Settings, go to the Input tab, click on your microphone, and drag the Input volume slider toward the right. For details, go to section 3. Configure and test your audio of the QuickStart instructions customized for you.

- Go to the Windows Sound Control Panel, go to the Recording tab, double-click on your microphone, go to the Levels tab, and drag the mic level slider to the right. For details, go to section 3. Configure and test your audio of the QuickStart instructions customized for you.

- If you’re not getting any sound input, check Windows mic permissions. If that doesn’t work, try pressing the microphone-mute key on your keyboard, if your PC has one.
- Ask the other participant to use the Channels: pull-down menu in FarPlay’s main window to switch to Mono Mix (or Mono).
- Go to FarPlay’s Preferences > General Options tab.
- In the Headphones row, choose Stereo and channels 1-2.
Audio is distorted or stops working
- If you haven’t yet, work through the steps in “Latency is too high” above (especially parts 1 and 4).
- Look in FarPlay’s Devices subpanel and switch your Headphones: to No Audio and then back to the headphones you want to use.

- Try raising your audio buffer size in FarPlay’s Preferences > General Options.
- Go to FarPlay’s Preferences > General Options. Raise your audio buffer size to 480 (10 ms). For details, go to section 3. Configure and test your audio of our QuickStart instructions customized for you.

- Try raising the ASIO buffer size to 64 or 128 samples. (Get to your audio interface’s ASIO Buffer Size settings by going to FarPlay’s Preferences > General Options tab and clicking the ASIO Buffer Settings button).
- If you haven’t yet, work through the steps for troubleshooting your computer’s connection in “Latency is too high, Part 1” above.
- Try raising your audio buffer size in FarPlay’s Preferences > General Options.
- Turn Windows Signal Enhancements off, as shown here.
- Go to FarPlay’s Preferences > General Options. Raise your audio buffer size to 480 (10 ms). For details, go to section 3. Configure and test your audio of our QuickStart instructions customized for you.

- Try raising the ASIO buffer size to 64 or 128 samples. (Get to your audio interface’s ASIO Buffer Size settings by going to FarPlay’s Preferences > General Options tab and clicking the ASIO Buffer Settings button, as illustrated in section 3. Configure and test your audio of our QuickStart instructions customized for you).

Video or screen sharing
- If you haven’t yet, work through the steps for troubleshooting your computer’s connection in “Latency is too high, Part 1” above.
- If video quality remains poor, the person whose video quality is poor when seen by others should try switching to a different webcam.
- Can you access your webcam in other apps? If not, there’s probably a problem outside of FarPlay.
- Make sure you’ve upgraded to the latest version of FarPlay. Upgrades are always free!
- Disconnect and reconnect the webcam.
- Check Mac camera permissions.
- Try sending video with a higher resolution:
- Click FarPlay’s Video menu and choose Video Preferences. Use the Your max resolution (width in pixels): pull-down menu to select 720 or greater. Press OK. For illustrations, see our instructions for adjusting video preferences.
- Reset camera permissions for FarPlay:
- In the macOS terminal, run
tccutil reset Camera io.farplay.client
- Open FarPlay. Open a session. Start video.
- When your Mac says, ‘”FarPlay” would like to access the camera,’ click OK.
- In the macOS terminal, run
- Run FarPlay from the Terminal:
- In the Applications folder, Control+Click FarPlay. Select “Show Package Contents.”
- Double-click “Contents” and then “MacOS.”
- Double-click the FarPlay executable.
- Even if this doesn’t solve your problem, we’d love to provide additional suggestions using a copy of the terminal output. Note: Terminal output shows session IDs. IP addresses and usernames might also appear in the terminal output. If you prefer, email your terminal output to us privately at support@farplay.io.
- Check Windows camera permissions.
- Turn off Norton SafeCam or change FarPlay’s setting to “Allow” in Norton SafeCam. See Norton’s instructions for configuring SafeCam. (Other security applications have similar settings).
- Try sending video with a higher resolution:
- Click the Options menu in the FarPlay Video window and click Video Preferences. Use the Your max resolution (width in pixels): pull-down menu to select 720 or greater. Press OK. For illustrations, see our instructions for adjusting video preferences.
- In FarPlay’s View menu, click Show Video to bring the video window to the front.
- Update your graphics card drivers using the Windows Device Manager, Windows Update, or the website of the manufacturer of your graphics card.
- Start video. Click the Camera icon in the video window and choose Share desktop screen. See our screen-sharing instructions for details.
- Reset screen-sharing permissions for FarPlay:
- In the macOS terminal, run
tccutil reset ScreenCapture io.farplay.client
- Open FarPlay. Open a session. Start video. Click the camera button and choose Share desktop screen.
- When your Mac says, ‘”FarPlay” would like to record this computer’s screen and audio,’ click Open System Settings and follow the instructions to grant FarPlay permission to record the screen (illustrated in our screen-sharing instructions).
- In the macOS terminal, run
Recording
- Click on FarPlay’s View menu, then click on Show Video Post-Processing Window.
- To find a video you already exported, click its Go To button. To export a video, click its Process button.
- Don’t move or delete the files for a recording until you’ve finished post processing the recording. If you moved the files before post-processing, move the files back to where you had FarPlay save them, then restart FarPlay.
- For more information, see our steps for recording video.
- Go to Preferences > Recording and make sure Apply monitor volume gains when recording a mix is unchecked.
- Learn more using our instructions for customizing recording settings.
Registration and subscriptions
- Search for an email from support@farplay.io, which might be in your SPAM folder.
- Try to reset your password at farplay.io/forgot, which will send you another email.
- If the above suggestions don’t work, please email us at support@farplay.io from the email address you tried to register.
Can’t hear instruments or backing tracks
Use as many input channels as you like on your audio interface by following our steps for using our input mixer.
Follow our instructionsinstructions for bringing system audio into FarPlay’s input mixer.
Use a virtual sound card to bring audio from a DAW into FarPlay. Try using ReaRoute to bring Reaper audio into FarPlay (might need a fast PC).
Follow our instructions for bringing audio from multiple sources into FarPlay’s input mixer.
- If possible, connect the analog outputs of the guitar amp, mic, etc. to an audio interface (or mixer connected to the audio interface) connected to your PC.
- Follow our instructions for bringing audio from multiple sources into FarPlay’s input mixer.
Issue with pan and gain in multi-user sessions
- Click the Session menu, open the Multi-User Session Options submenu, and verify that Auto Load Last Multi-User Pan & Gain is checked. This makes pan and gain settings for remote participants persist between multi-user sessions.
- For more information, see the Remember pan and gain settings section of our instructions on multi-user session controls.
Audio equipment is uncomfortable or inconvenient

Can’t connect
- Click on the invitation link on the computer where you installed FarPlay.
- If the link is hard for you to access on your computer, ask for the invitation link to be resent in a way you can access on your computer (example: email).

- Ask your internet service providers for Public IPs, which are often available for modest monthly fees.
- Ask your internet service providers to help you enable IPv6 on your routers.
- Switch from mobile internet to VDSL, cable, or, even better, fiber internet. Mobile (example: 5G) internet providers outside the United States are often set up in a way that makes using peer-to-peer apps like FarPlay more difficult.
- If a home internet user is trying to connect to a user on a university/workplace network, have the home user port forward or have the university/workplace user try to connect from home.
- Ask university/workplace IT admins to review FarPlay’s network requirements.
- Make sure the MacWindows firewall isn’t blocking traffic for FarPlay. Either allow FarPlay specifically through the firewall, or turn your computer’s firewall off completely. See Mac firewall instructionsWindows firewall instructions.
- Make sure a 3rd-party security app isn’t blocking traffic for FarPlay. For example, if you use Norton, see Norton’s firewall instructions.
- If you use a VPN, make sure to turn it off when using FarPlay.
Accessibility
- Use macOS’s built-in VoiceOver for screen reading and keyboard navigation.
- In VoiceOver Utility, go to the Navigation page. Make sure Synchronize keyboard focus and VoiceOver cursor is unchecked. Make sure Mouse pointer: is set to Moves VoiceOver cursor.
- Use the NVDA screen reader for screen reading and keyboard navigation. Download NVDA for free here.
- For guidance with keyboard navigation, including a list of keyboard shortcuts and instructions for working with menus for selecting audio devices, visit our accessibility page for Mac users.
- For guidance with keyboard navigation, including a list of keyboard shortcuts and instructions for working with menus for selecting audio devices, visit our accessibility page for Windows users.
- We’re aware that chat is currently inaccessible to VoiceOver and keyboard navigation. We’ll improve accessibility for chat as soon as we can.
- We’re also aware that some of the information in the video post-processing window is not accessible to VoiceOver. To post-process video recordings, use the following steps.
- Navigate the table of recordings using the tab key, rather than arrow keys.
- When you’ve tabbed to the name of a recording you want to post-process, press the tab key an additional five times and then press Space to open a dialog box containing a “Process” button you can select to begin post-processing. A dialog box announces when processing is complete.
- If you’ve tabbed to the name of a recording that was previously processed, you can press the tab key six times and press Space to open the location of the output files in Finder.
- Alternatively, if you’ve tabbed to the name of a recording that was previously processed, you can press the tab key seven times and press Space to remove the temporary files.
- We’re aware that chat isn’t accessible through keyboard navigation. We’ll improve accessibility for chat as soon as we can.
 Don’t use a wireless extender/repeater router, secondary router (like an Apple Time Capsule), or Ethernet-over-power adapter (like a Powerline adapter). A repeater/extender router repeats the signal from your main router.


