TIPS + TRICKS
Manually Adjust your Latency
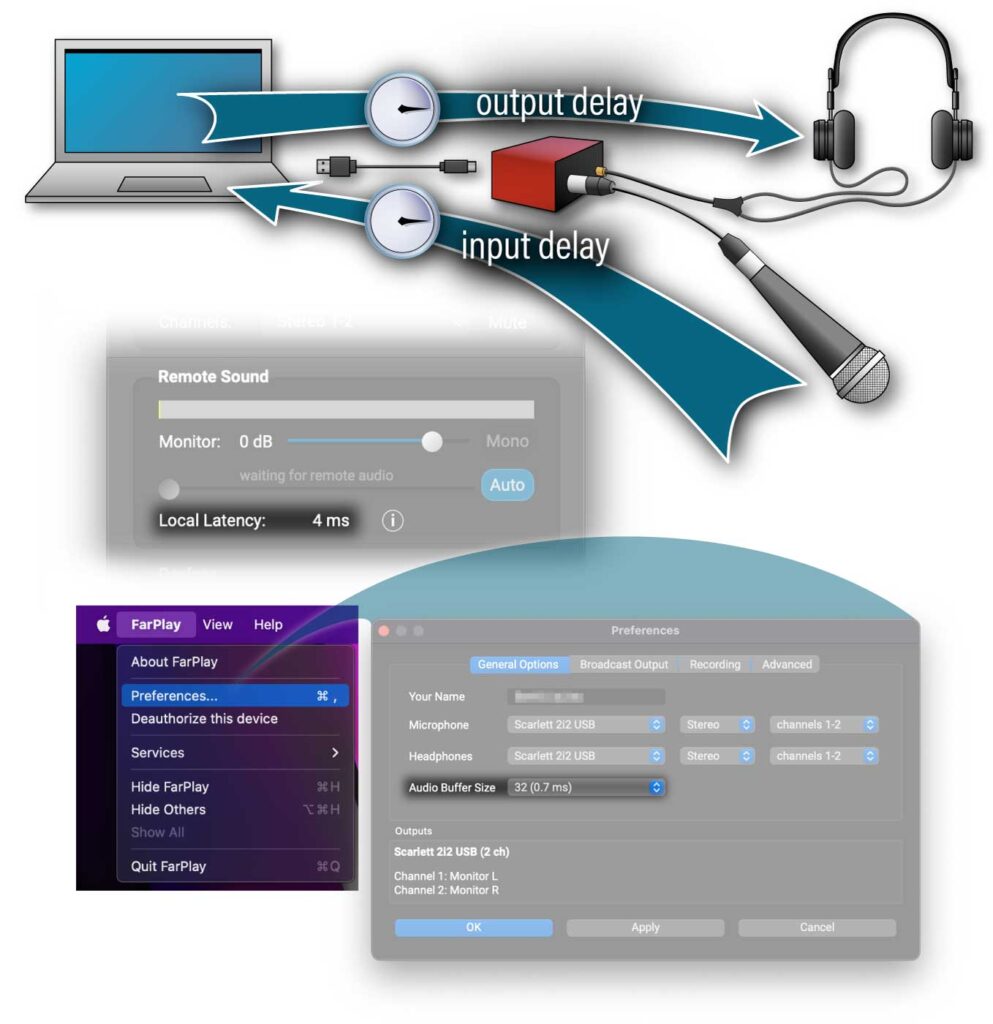
With the Auto button engaged , FarPlay will continuously adjust your latency to maintain good sound quality in the audio you hear. If there’s a spike in internet traffic, for example, FarPlay will automatically increase your latency to avoid glitches in the audio.
This works well for many cases, but for advanced use, when maintaining the lowest, most stable latency is important (when playing highly rhythmic music, for example), we recommend disengaging the Auto button  and setting your latency manually using the slider. If there’s a spike in internet traffic, you may briefly hear some audio glitches, but they should quickly go away, and your overall latency will stay stable.
 and setting your latency manually using the slider. If there’s a spike in internet traffic, you may briefly hear some audio glitches, but they should quickly go away, and your overall latency will stay stable.
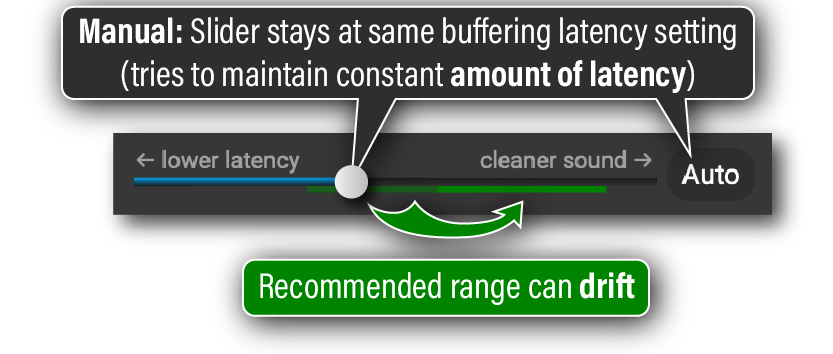
Standard and Standard+ subscribers can create 1 Persistent Room. If you subscribe to FarPlay For Teachers, you can create 10 Persistent Rooms.
To create your first Persistent Room, click the New Session button on the welcome screen and choose Create a Persistent Room.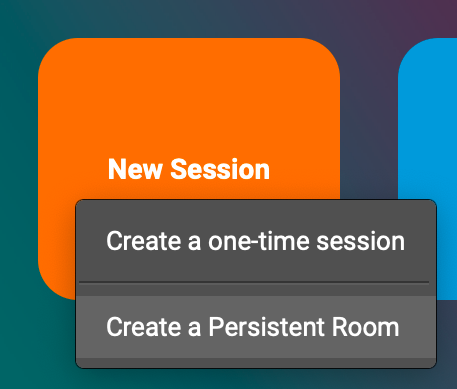 Follow the on-screen instructions to choose a name for your new Persistent Room.
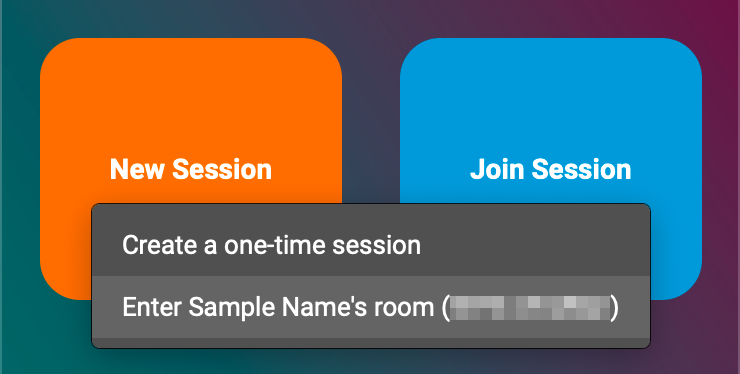
Once you’ve created your first Persistent Room, an option to enter it will appear when you click the New Session button.

If a participant arrives before you’ve started a session in your Persistent Room, they’ll be shown a message telling them to wait for you to start the session. They’ll automatically join the session when you join the session.
When you’re in your Persistent Room, you can control the Waiting Room using the padlock icon in the Session section. The unlocked padlock indicates that participants will join your session immediately upon arrival.
Click the padlock to lock the session. Participants will be sent to the Waiting Room when they arrive.
When a participant arrives, FarPlay pops up the Waiting Room window.
Click Admit or Deny to admit or deny the selected participants. For more details, go to our Waiting Room instructions.
 When you’re in your Persistent Room, you can control the Waiting Room using the padlock icon in the Session section. The unlocked padlock indicates that participants will join your session immediately upon arrival.
 Click the padlock to lock the session. Participants will be sent to the Waiting Room when they arrive.
 When a participant arrives, FarPlay pops up the Waiting Room window.
 Click Admit or Deny to admit or deny the selected participants. For more details, go to our Waiting Room instructions.
Invitation Links
FarPlay 1.2.4 introduced Invitation Links. Just click the link to join the session! You no longer need to paste Session IDs. To invite participants to an active session, look in the Session section, click Invite, and choose Copy invitation. Share your invitation (for example, using text messages and emails). For sessions you create in free mode, the Invite button is disabled once you and one other participant are in the session. To create sessions with more users, subscribe.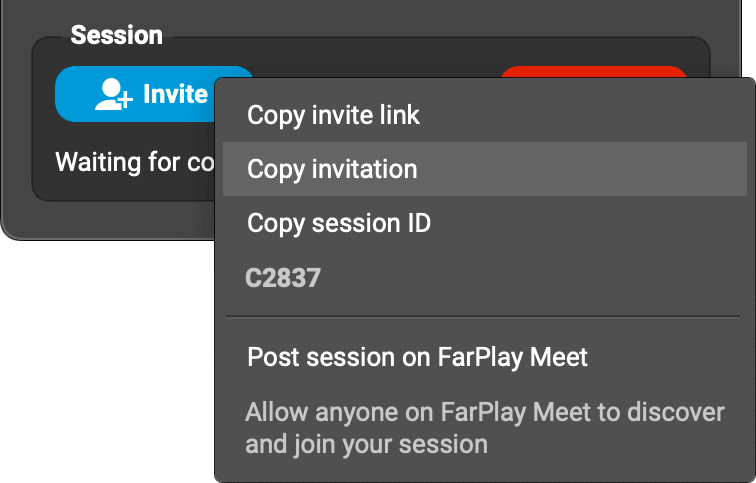
Chat
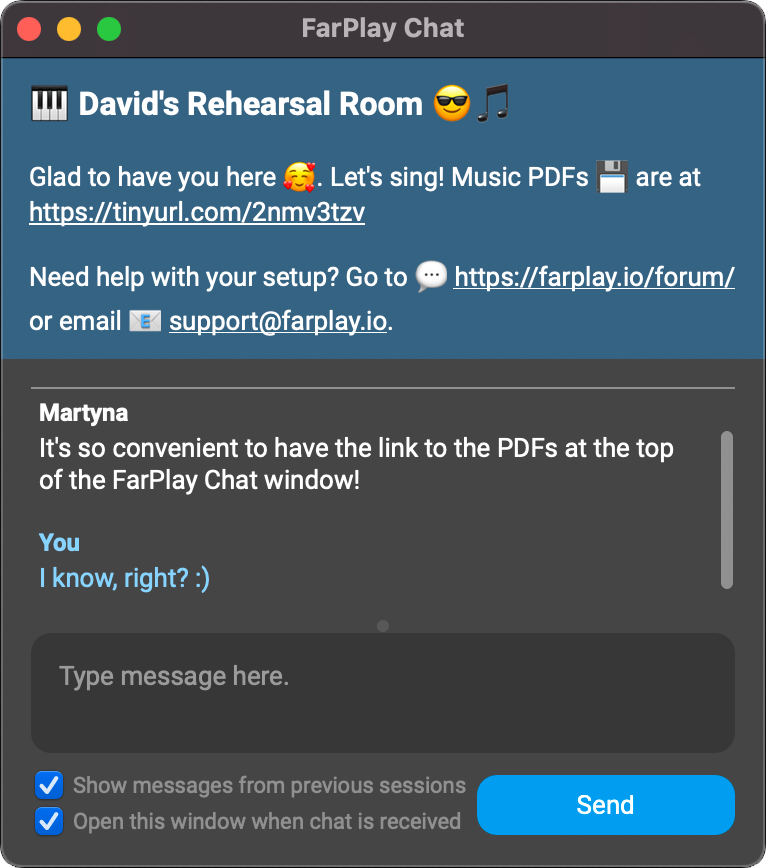
As of version 1.1, FarPlay features Chat functionality, allowing you to chat via text with other participants in the session. To activate this feature, the person initiating the session must have a subscription. Chat is useful during setup, particularly if a participant has not yet connected their audio; it’s also useful for behind-the-scenes communication during a live performance. To open the chat window, Chat button under Tools in the main FarPlay window or click the Open chat icon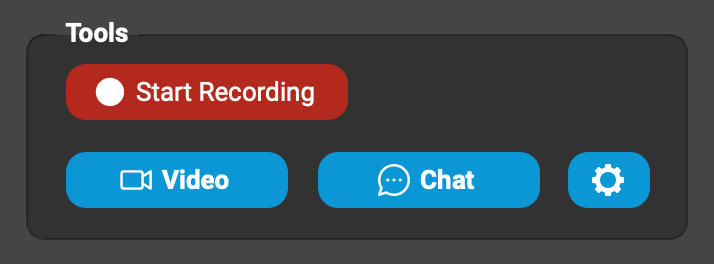 By default, FarPlay opens the Chat window automatically when a new message is received, but this behavior can be disabled if preferred by unchecking the “Open this window when chat is received” checkbox. The Chat window shows you messages from the current and previous sessions by default (great for reviewing notes from previous lessons). To hide messages from previous sessions, uncheck the “Show messages from previous sessions” checkbox.
 New in version 1.3.2, subscribers can create Chat Banners for their Persistent Rooms. A room’s banner is visible to each user who joins the room — great for keeping links to folders of music PDFs handy. Learn more about Chat Banners here.
 Share your screen
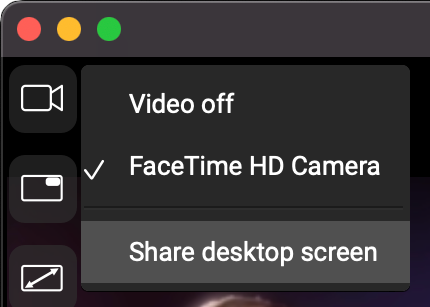
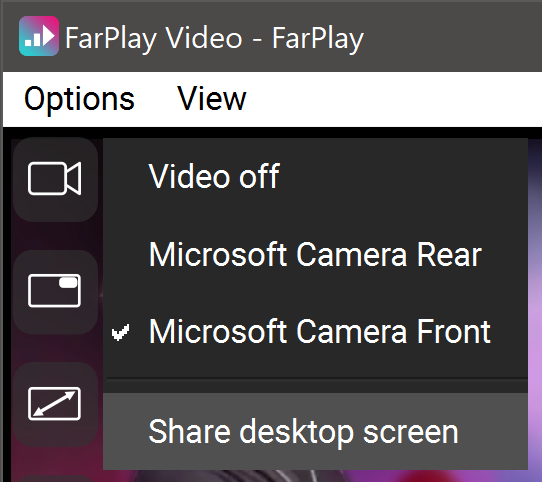
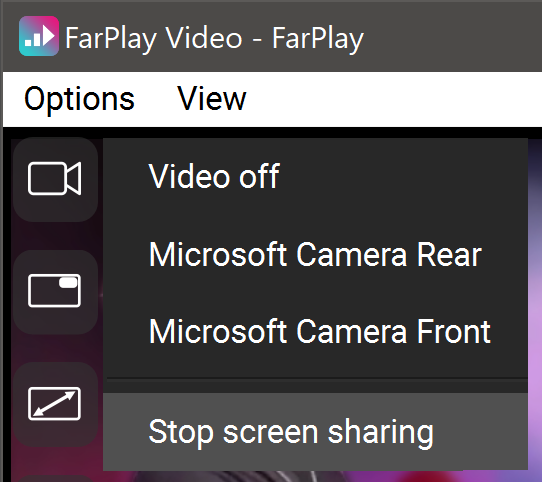
- To share your screen, click the Camera icon
 in the video window and choose Share desktop screen.
- If this is your first time sharing your screen in FarPlay, you’ll need to let macOS know that it’s OK for FarPlay to see your screen. Do this using our step-by-step instructions.
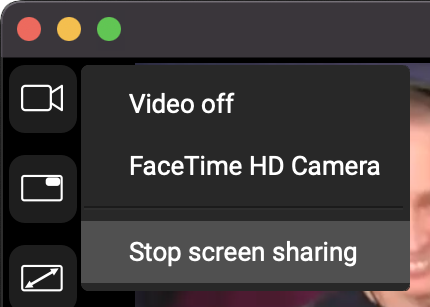
- To stop sharing your screen, click the Camera icon and choose Stop screen sharing.
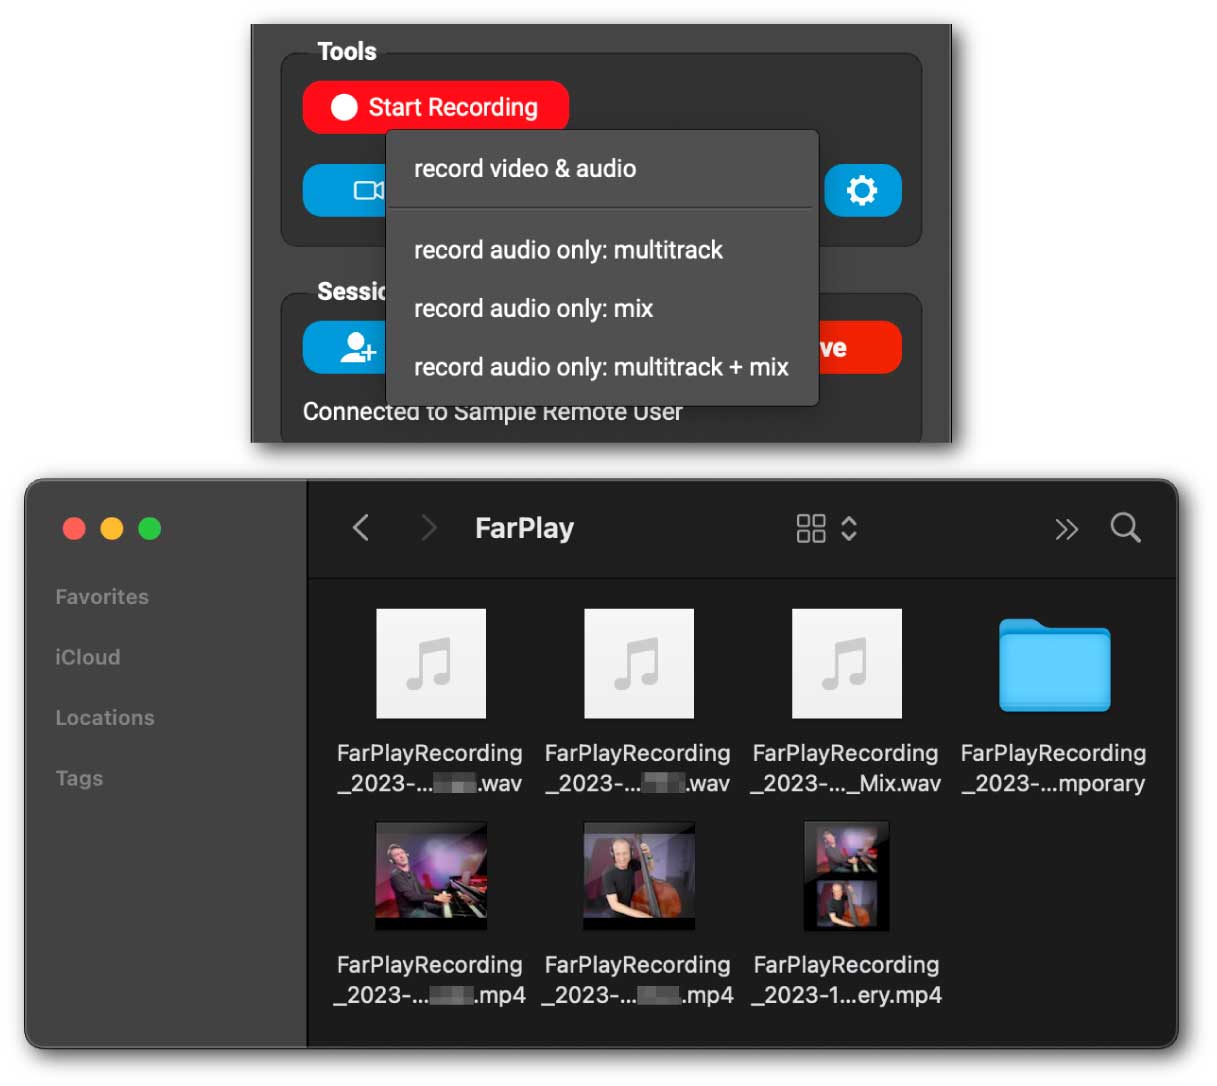
To get started, go to the Tools section and click Start Recording. Choose record video & audio. Learn more about video recording using our step-by-step instructions.
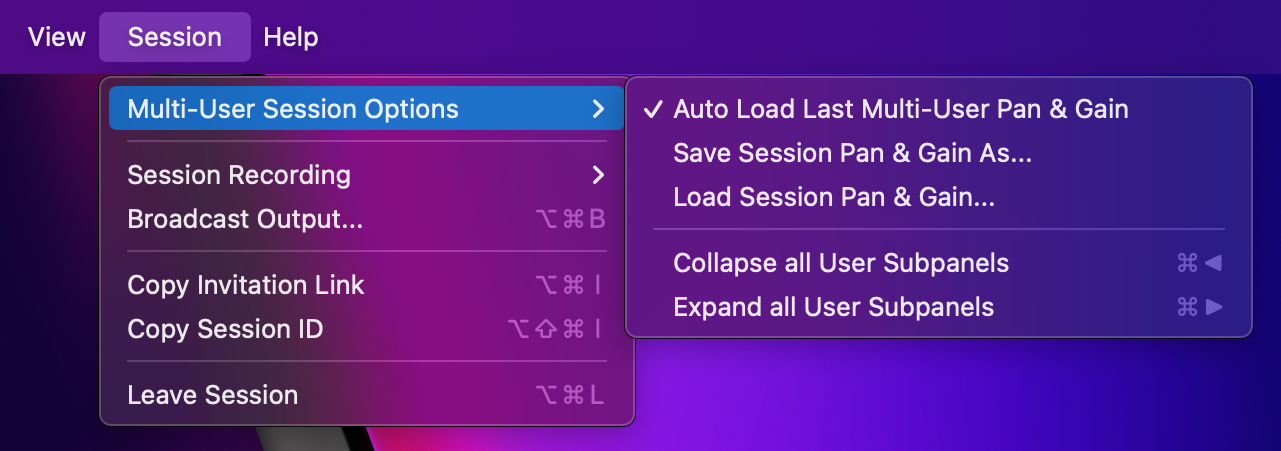
Click on the Session menu and open the Multi-User Session Options submenu. To make pan and gain settings for remote participants persist between multi-user sessions, verify that Auto Load Last Multi-User Pan & Gain is checked. Save pan and gain settings to a file for all session participants by choosing Save Session Pan & Gain As…. Use a previously-saved pan and gain settings file by choosing Load Session Pan & Gain….
To learn more, go to the section on saving and reusing pan and gain settings in our tutorial for multi-user sessions.
 To learn more, go to the section on saving and reusing pan and gain settings in our tutorial for multi-user sessions.
 Input mixer
FarPlay’s input mixer was first introduced with version 1.2.4. Starting with version 1.3.0, FarPlay’s input mixer lets you combine audio from multiple audio devices at the same time, making it convenient to bring backing tracks into your session, for example. FarPlay 1.3.0 also introduces reverb that can be adjusted for each track in the mixer.
To use the mixer, go to the Devices subpanel, click the Microphone: pull-down menu, and select Input Mixer (2nd item).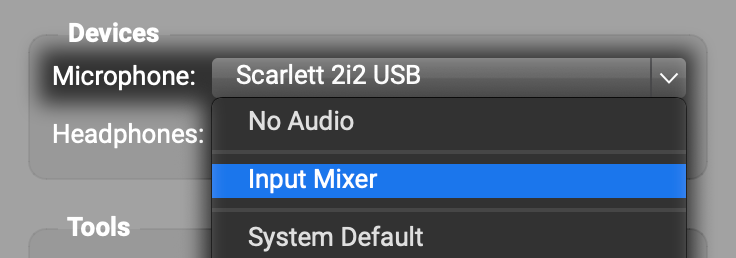
Create tracks and adjust gains and pans as you would in other audio software. You can use different audio devices as inputs for different tracks.
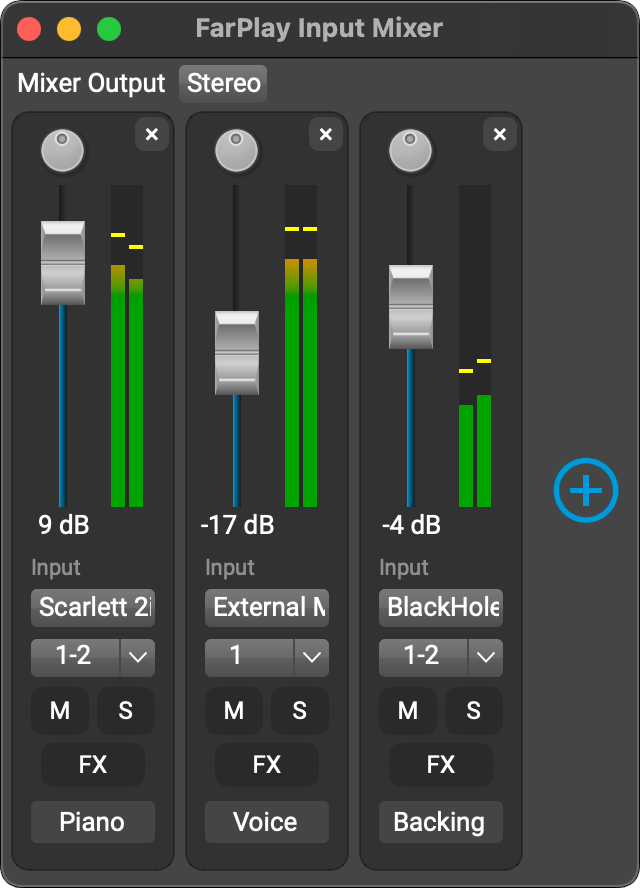 To learn more, go to our mixer page.
 Using FarPlay without headphones
Headphones are the simplest and most reliable way to prevent feedback when using FarPlay. As an alternative, you can use speakers if you use a directional mic. Point the mic towards you and away from the speakers. Put the mic close to you and far from the speakers. For more details, see our step-by-step instructions.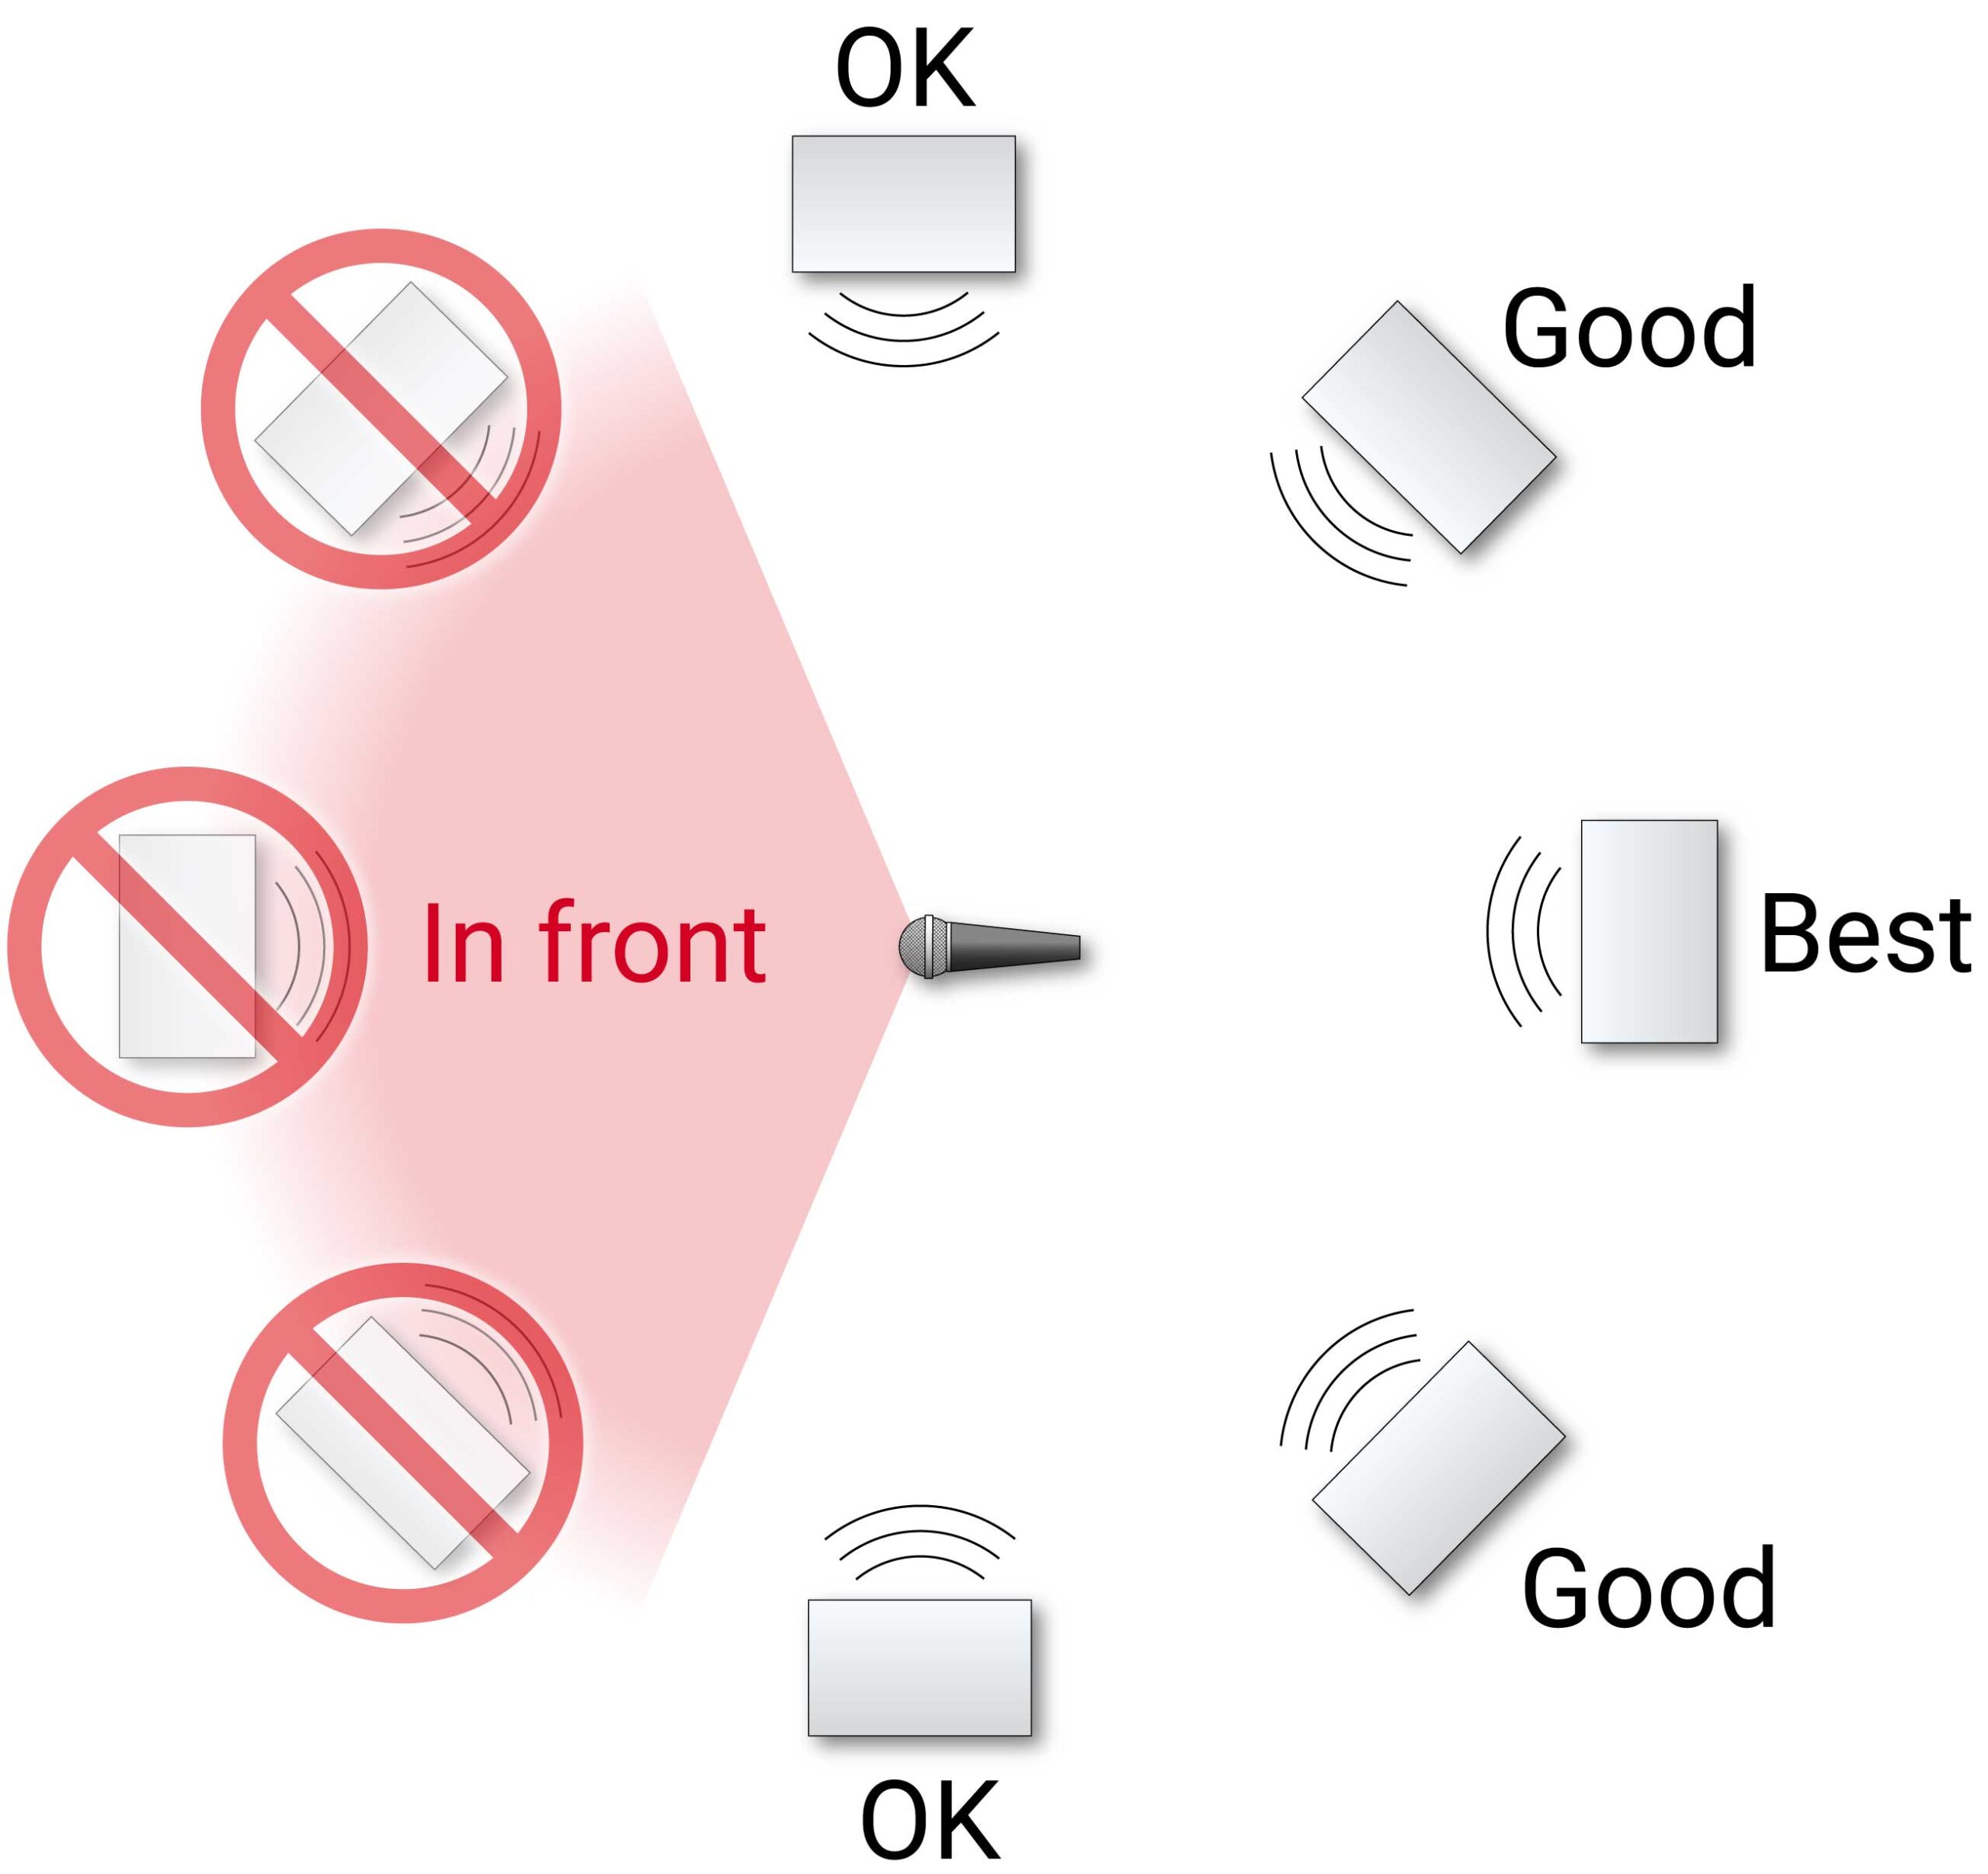
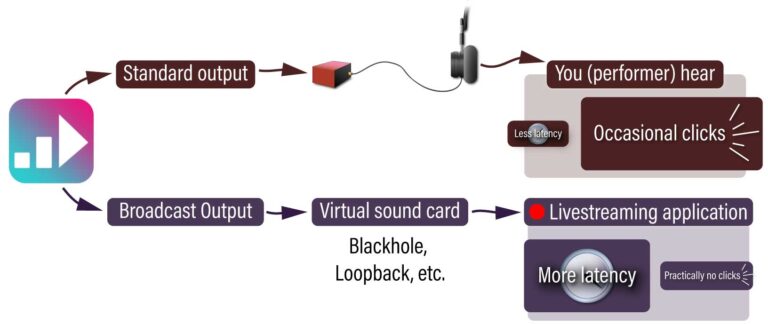
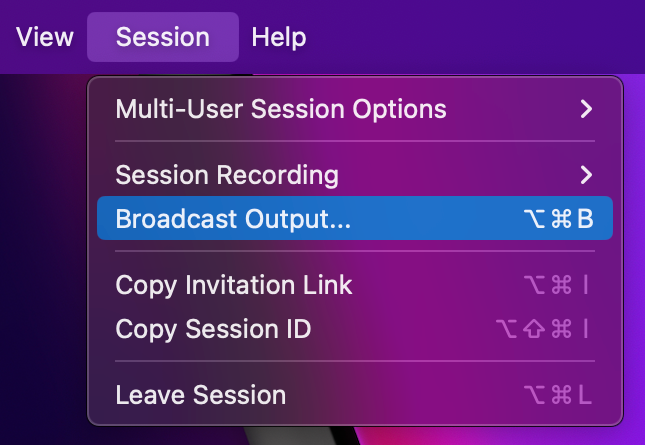
If you’ve already installed a virtual sound card and just need to find the Broadcast Output settings in FarPlay, click the Session menu and choose Broadcast Output.
In the Broadcast Output window that appears, use the Output Device pull-down menu to select your virtual sound card.
For step-by-step instructions, including for livestreaming, visit our Broadcast Output page.
 In the Broadcast Output window that appears, use the Output Device pull-down menu to select your virtual sound card.
 For step-by-step instructions, including for livestreaming, visit our Broadcast Output page.
 Fix “Failed to connect to …” error
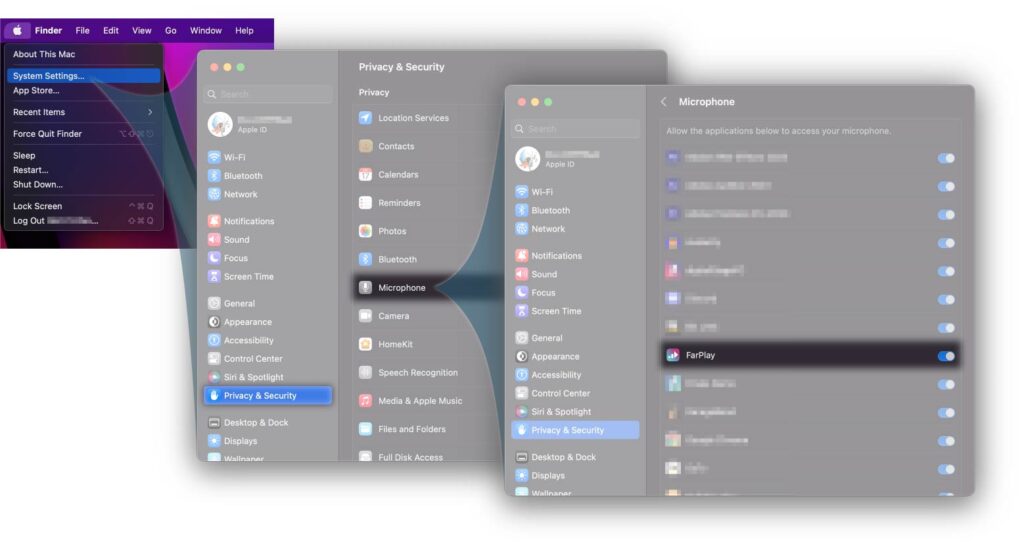
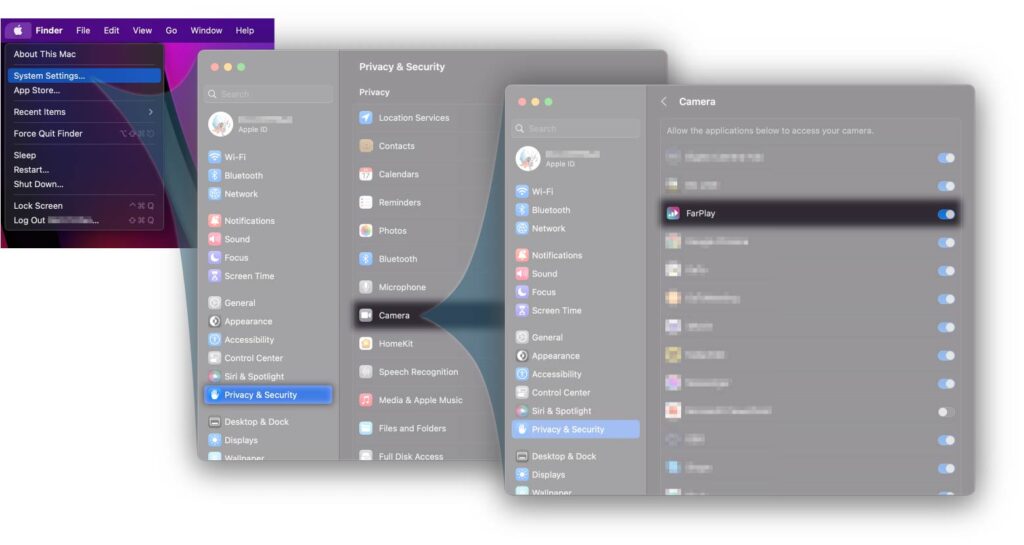
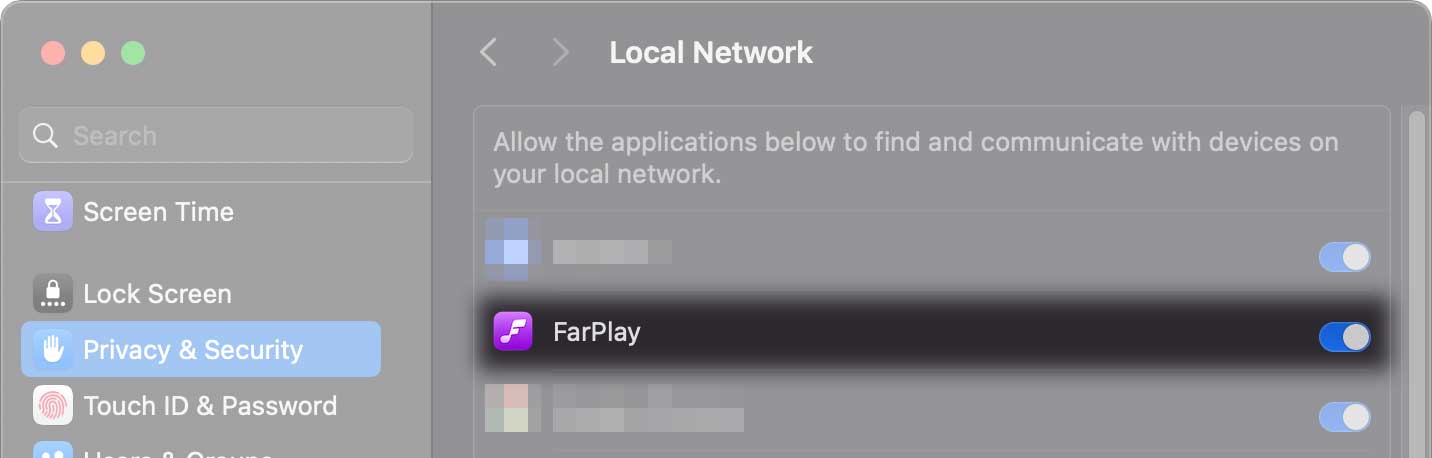
Most users use FarPlay without making any changes to their network settings (remember to use Ethernet!). In unusual cases, you might get a “Failed to connect to …” error.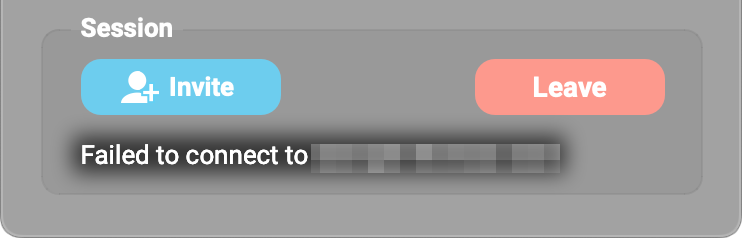 If you’re using macOS Sequoia and above, go to your Mac’s System Settings > Privacy & Security. Choose Local Network. Click the toggle switch to give FarPlay permission.
Audio limiter
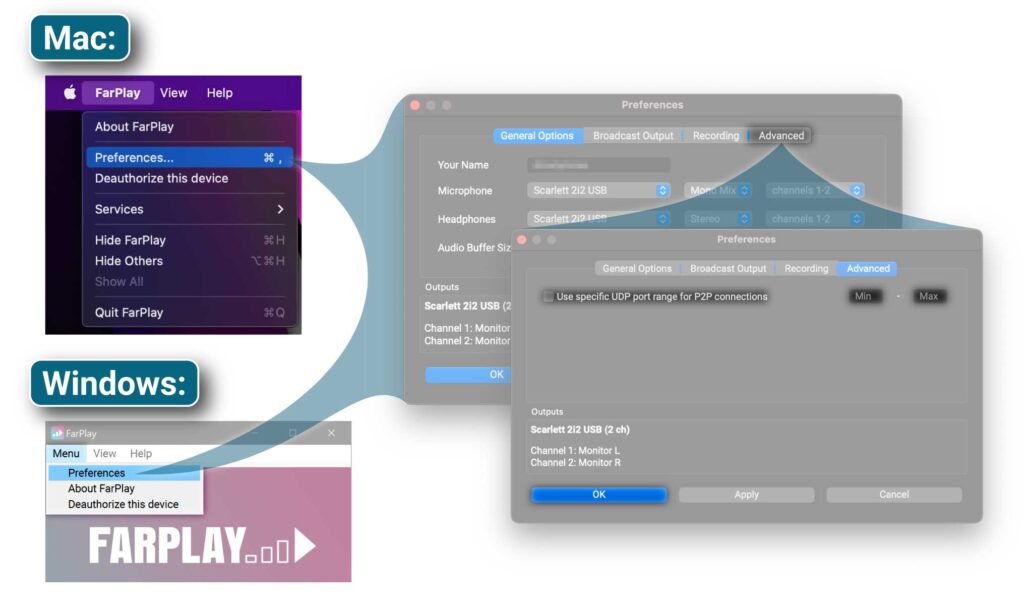
FarPlay 1.2.6 introduces a limiter to prevent the input mixer, output monitor, mix recording, and broadcast output from introducing clipping. You can adjust settings for the limiter or turn it off completely.- Open FarPlay Preferences by clicking the gear .
- Select the Advanced tab.
- To use the limiter, check the checkbox labeled Audio Limiter. The limiter is on by default.
- To adjust the attack time (in ms) and release time (in ms), adjust the two values in this row.
 .
.
