TIPS + TRICKS
When in doubt, reboot
If you encounter any issues with FarPlay, the first thing to try is to restart your computer. Yes, we know that’s the oldest trick in the book, but it’s amazing how often it helps.Manually Adjust your Latency
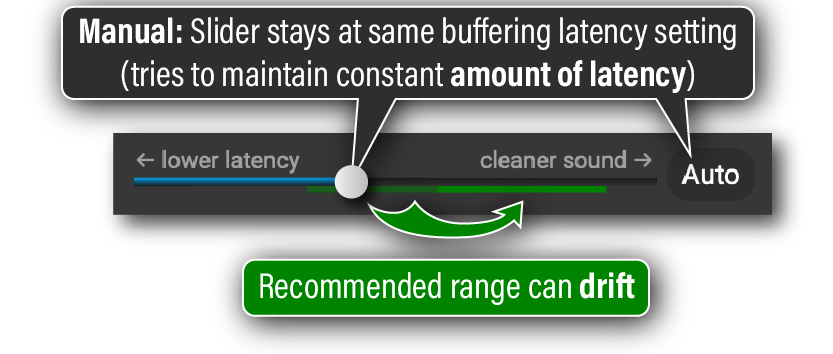
With the Auto button engaged , FarPlay will continuously adjust your latency to maintain good sound quality in the audio you hear. If there’s a spike in internet traffic, for example, FarPlay will automatically increase your latency to avoid glitches in the audio.
  and setting your latency manually using the slider. If there’s a spike in internet traffic, you may briefly hear some audio glitches, but they should quickly go away, and your overall latency will stay stable.
Persistent Rooms
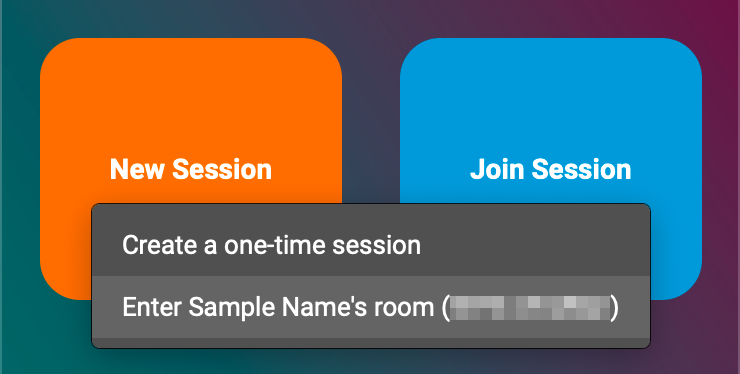
FarPlay features Persistent Rooms, allowing you to use a permanent, dedicated invitation link for all your sessions. You also have the option of creating a one-time invitation link if you prefer. This feature is particularly useful for teachers, who can give students their Persistent Room’s invitation link once and keep using it for as many sessions as they’d like.
Standard and Standard+ subscribers can create 1 Persistent Room. If you subscribe to FarPlay For Teachers, you can create 10 Persistent Rooms.
To create your first Persistent Room, click the New Session button on the welcome screen and choose Create a Persistent Room.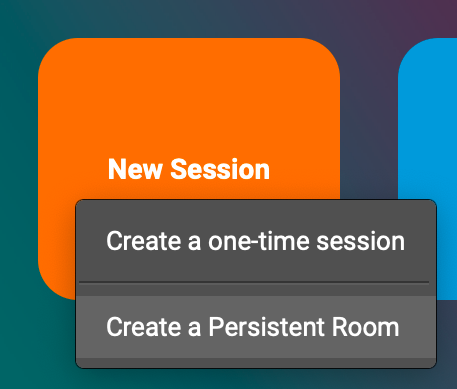 Follow the on-screen instructions to choose a name for your new Persistent Room.
Waiting Room
FarPlay provides a Waiting Room for each Persistent Room.If a participant arrives before you’ve started a session in your Persistent Room, they’ll be shown a message telling them to wait for you to start the session. They’ll automatically join the session when you join the session.

When you’re in your Persistent Room, you can control the Waiting Room using the padlock icon in the Session section. The unlocked padlock indicates that participants will join your session immediately upon arrival.

Click the padlock to lock the session. Participants will be sent to the Waiting Room when they arrive.

When a participant arrives, FarPlay pops up the Waiting Room window.

Click Admit or Deny to admit or deny the selected participants. For more details, go to our Waiting Room instructions.
Invitation Links
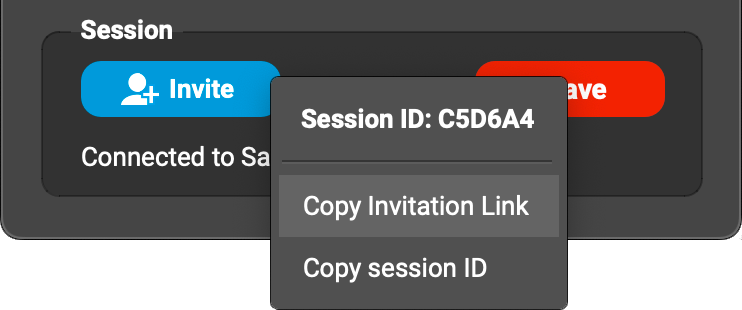
FarPlay 1.2.4 introduces Invitation Links. Just click the link to join the session! You no longer need to paste Session IDs. To invite participants to an active session, look in the Session section, click Invite, and choose Copy Invitation Link. Share your invitation link (for example, using text messages and emails). For sessions you create in free mode, the Invite button is disabled once you and one other participant are in the session. To create sessions with more users, subscribe.
Chat
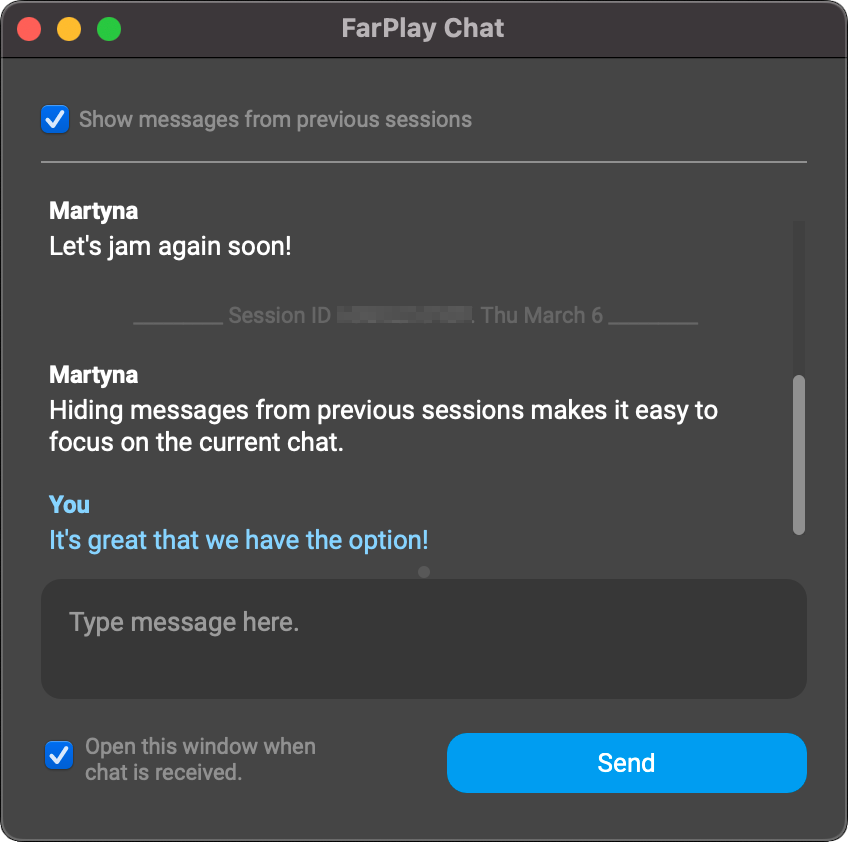
As of version 1.1, FarPlay features Chat functionality, allowing you to chat via text with other participants in the session. To activate this feature, the person initiating the session must have a subscription. Chat is useful during setup, particularly if a participant has not yet connected their audio; it’s also useful for behind-the-scenes communication during a live performance. To open the chat window, Chat button under Tools in the main FarPlay window or click the Open chat icon By default, FarPlay opens the Chat window automatically when a new message is received, but this behavior can be disabled if preferred by unchecking the “Open this window when chat is received” checkbox. The Chat window shows you messages from the current and previous sessions by default (great for reviewing notes from previous lessons). To hide messages from previous sessions, uncheck the “Show messages from previous sessions” checkbox.
Share your screen
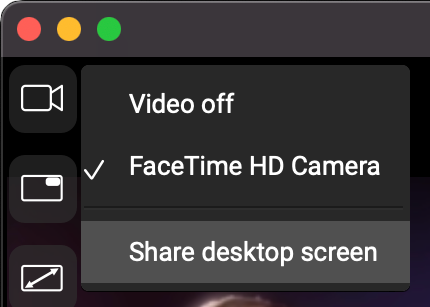
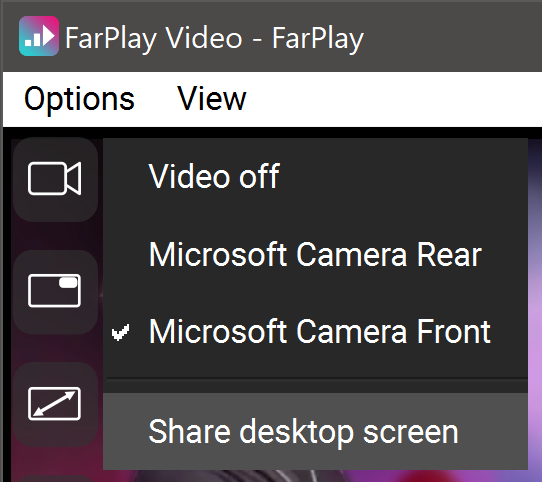
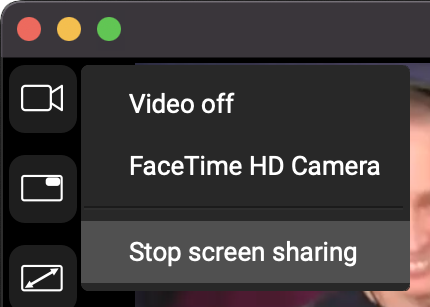
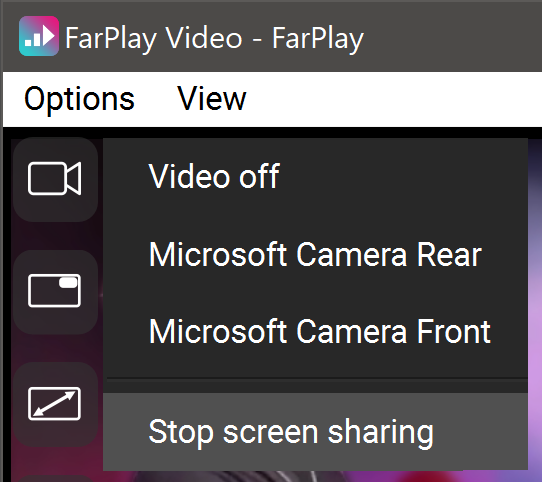
- To share your screen, click the Camera icon
 in the video window and choose Share desktop screen.


- If this is your first time sharing your screen in FarPlay, you’ll need to let macOS know that it’s OK for FarPlay to see your screen. Do this using our step-by-step instructions.
- To stop sharing your screen, click the Camera icon and choose Stop screen sharing.


Video recording
Subscribers can use FarPlay’s built-in video recording—no need to run a 3rd-party screen capture application! Standard and Standard+ subscribers can record gallery video (shows multiple participants in a single view). Standard+ subscribers also get individual video tracks for individual participants (convenient for video editing). All participants, even those without subscriptions, can record multitrack audio and video in sessions created by FarPlay For Teachers subscribers.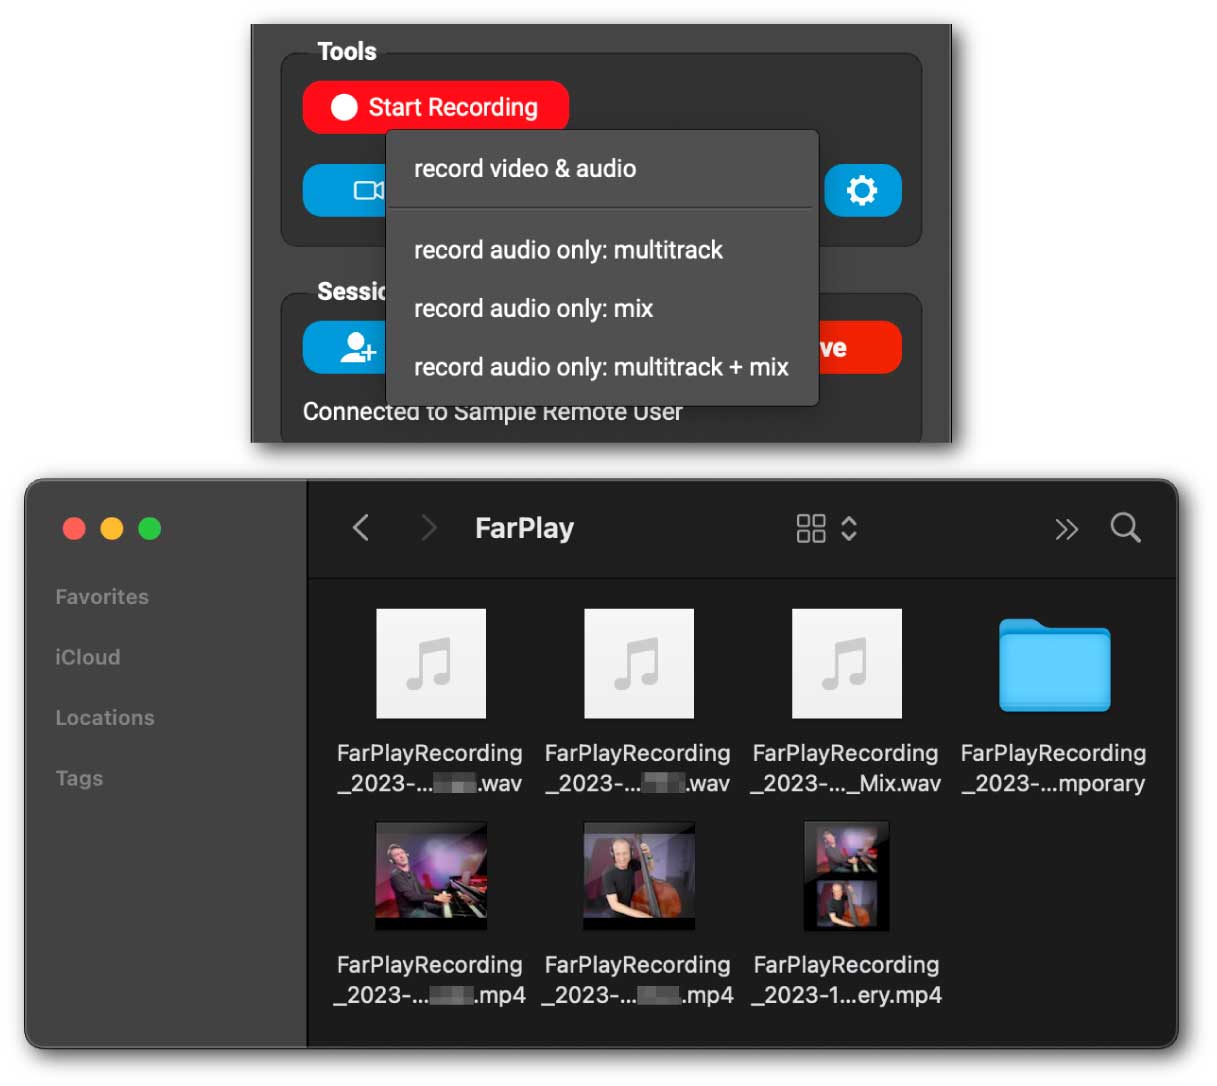
Tips for Teachers
FarPlay is great for teaching music online! Getting students started is easy—we’ve made an email template teachers can customize.Microphone Permissions on Mac
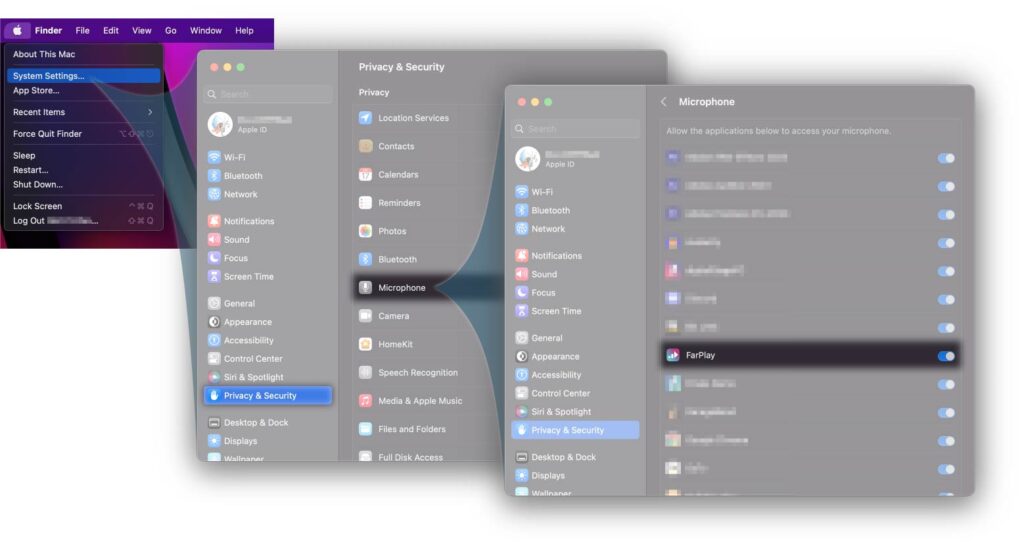
If you’re not getting any sound input on macOS, this is likely due to a mic permissions issue. To fix this, do the following:- Quit FarPlay.
- Open the Apple Menu at the top-left corner of the screen, choose System Settings and then Privacy & Security.
- Click Microphone.
- Scroll down to FarPlay.
- Make sure the toggle switch next to FarPlay is ON.
- Reopen FarPlay, and you should now have sound input from your microphone.
Camera Permissions on Mac
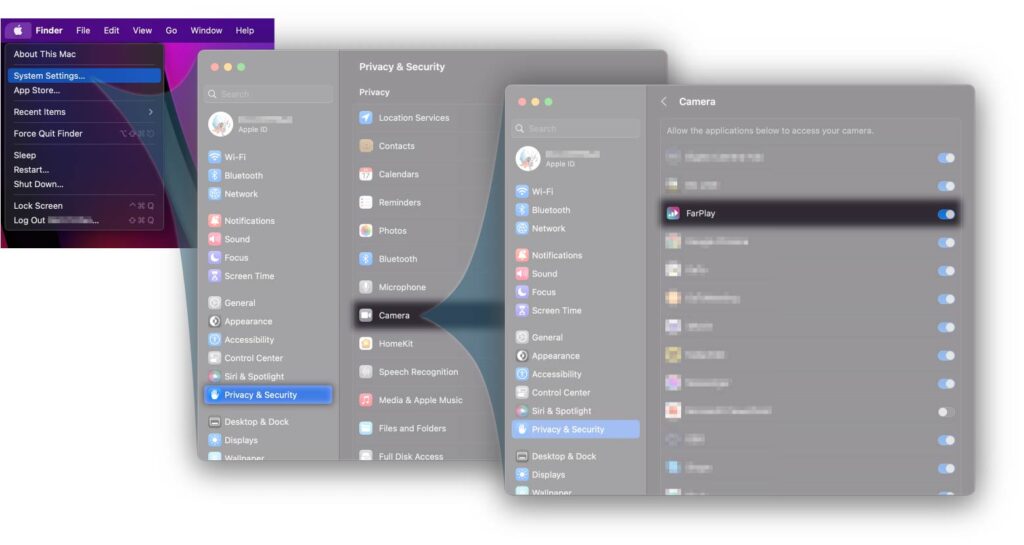
If you’re not getting an image from your camera on macOS, this is likely due to a camera permissions issue. To fix this, do the following:- Quit FarPlay.
- Open the Apple Menu at the top-left corner of the screen, choose System Settings and then Privacy & Security.
- Click Camera.
- Scroll down to FarPlay.
- Make sure the toggle switch next to FarPlay is ON.
- Reopen FarPlay, and you should now have video input from your camera. If not, restarting your computer at this point should fully solve the issue.
Working with Windows
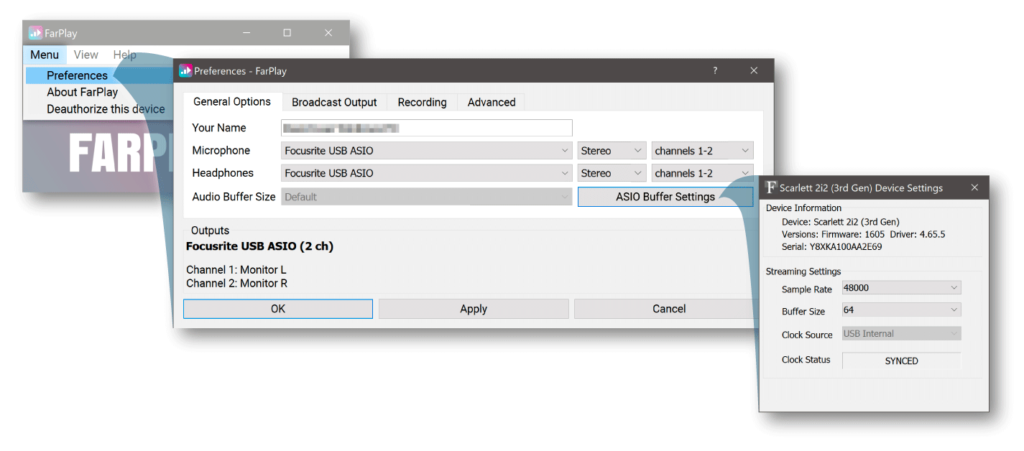
FarPlay supports native Windows audio devices, so you can use FarPlay immediately with your computer’s integrated audio device, without any additional downloads. FarPlay also supports ASIO devices and drivers, which will give you the best possible latency. We have more information on optimizing your Windows setup here.Fine-tune your Hardware Buffer
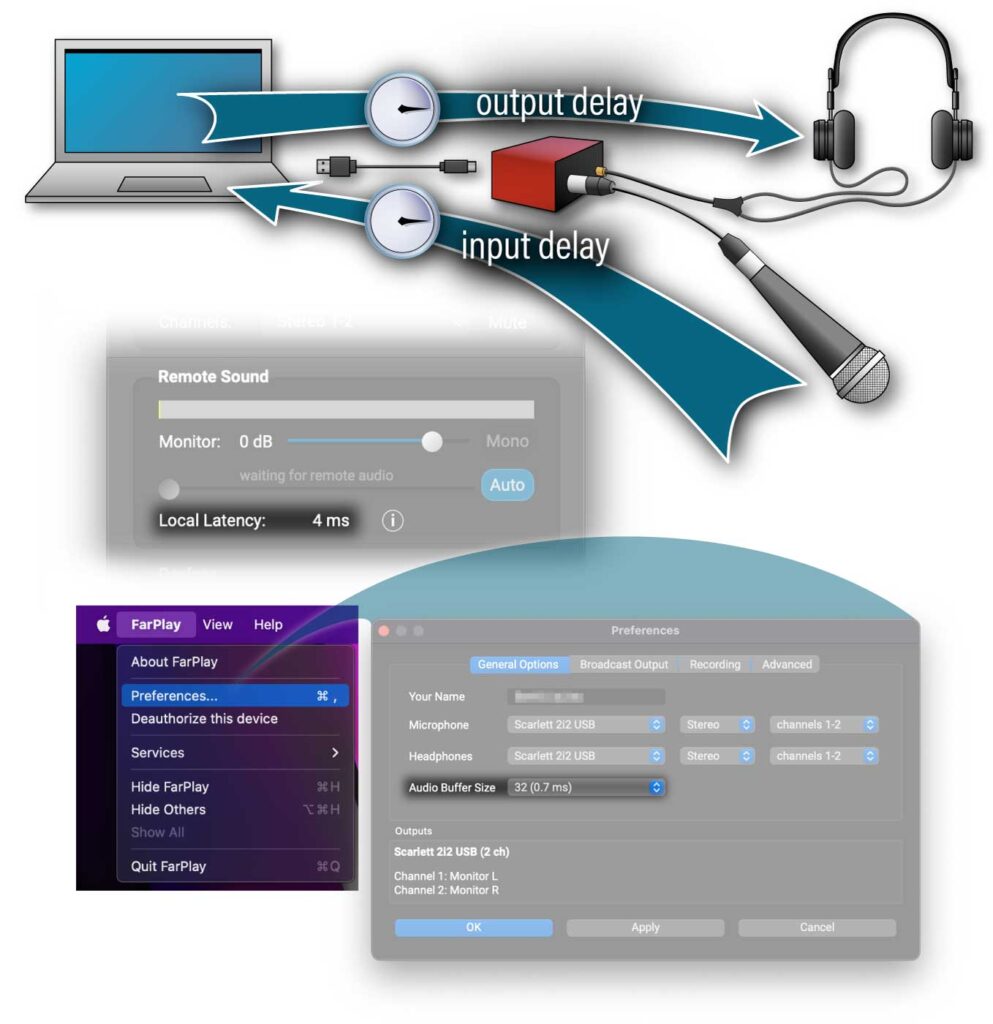
When you first start a session, before anyone else connects, you’ll find your Local Latency displayed under Remote Sound. This is an estimate of the total latency in your audio hardware, from capture at the mic to reproduction in your headphones. You can fine-tune this by adjusting the Audio Buffer Size in Preferences.⚠ If you’re using Windows, you’ll need to use an external audio interface with reliable manufacturer-provided ASIO drivers. When this is the case, the Audio Buffer Size is adjusted using the ASIO Buffer Settings button or an icon the audio interface’s software puts in the system tray.
Remember pan and gain settings
FarPlay 1.2.6 introduces the ability to save and reuse pan and gain settings in multi-user sessions. If you meet with an ensemble regularly, this feature lets you avoid readjusting remote participant pans and gains for every session.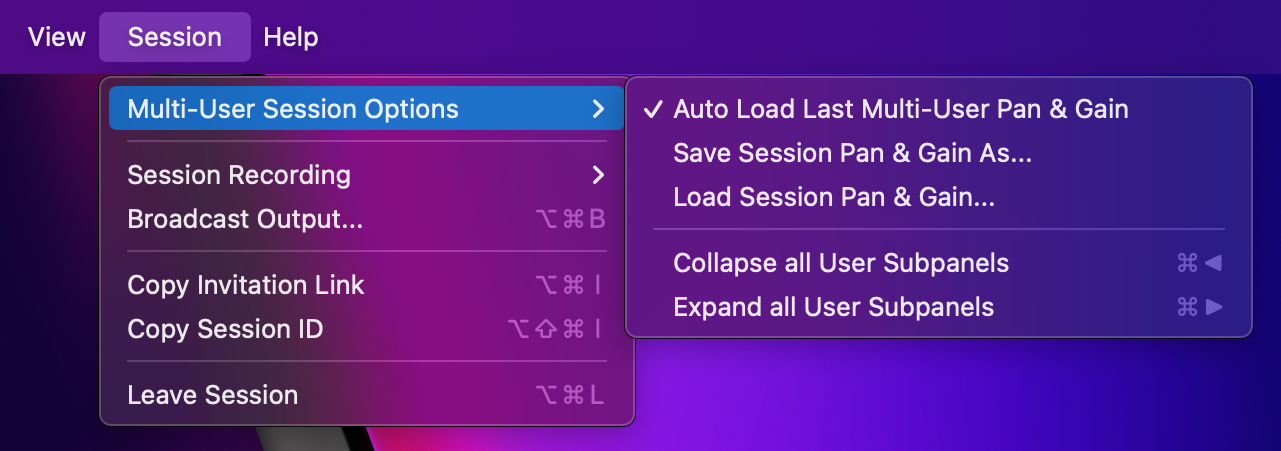 To learn more, go to the section on saving and reusing pan and gain settings in our tutorial for multi-user sessions.
 Input mixer
FarPlay’s input mixer was first introduced with version 1.2.4. Starting with version 1.3.0, FarPlay’s input mixer lets you combine audio from multiple audio devices at the same time, making it convenient to bring backing tracks into your session, for example. FarPlay 1.3.0 also introduces reverb that can be adjusted for each track in the mixer.
To use the mixer, go to the Devices subpanel, click the Microphone: pull-down menu, and select Input Mixer (2nd item).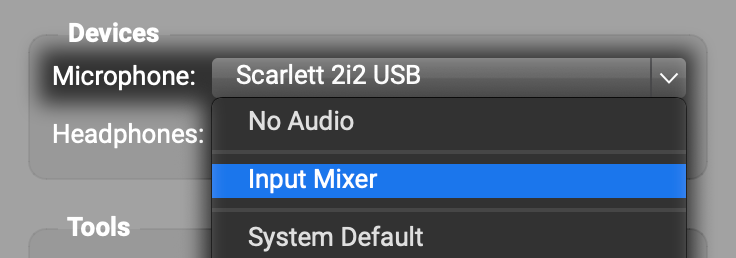
Create tracks and adjust gains and pans as you would in other audio software. You can use different audio devices as inputs for different tracks.
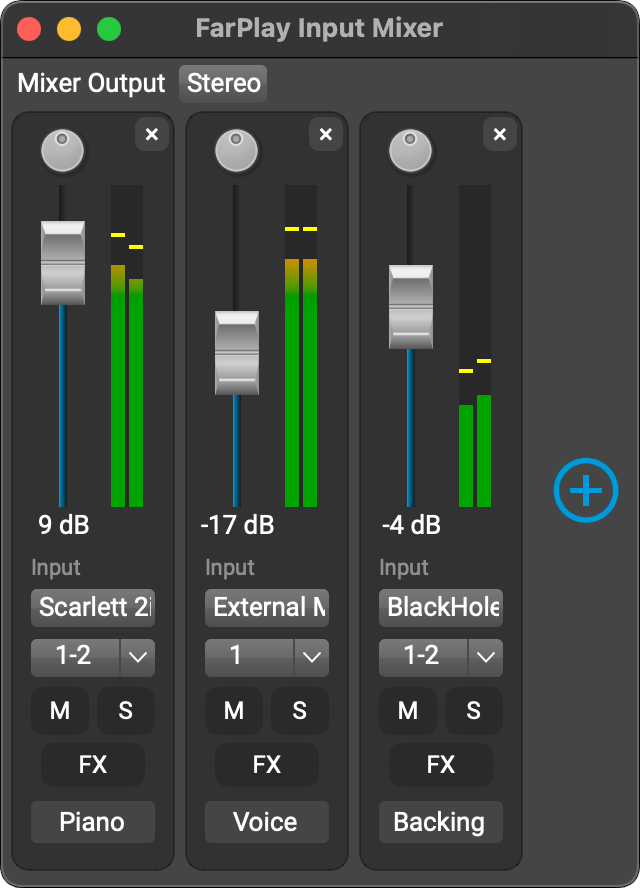 To learn more, go to our mixer page.
 Using FarPlay without headphones
Headphones are the simplest and most reliable way to prevent feedback when using FarPlay. As an alternative, you can use speakers if you use a directional mic. Point the mic towards you and away from the speakers. Put the mic close to you and far from the speakers. For more details, see our step-by-step instructions.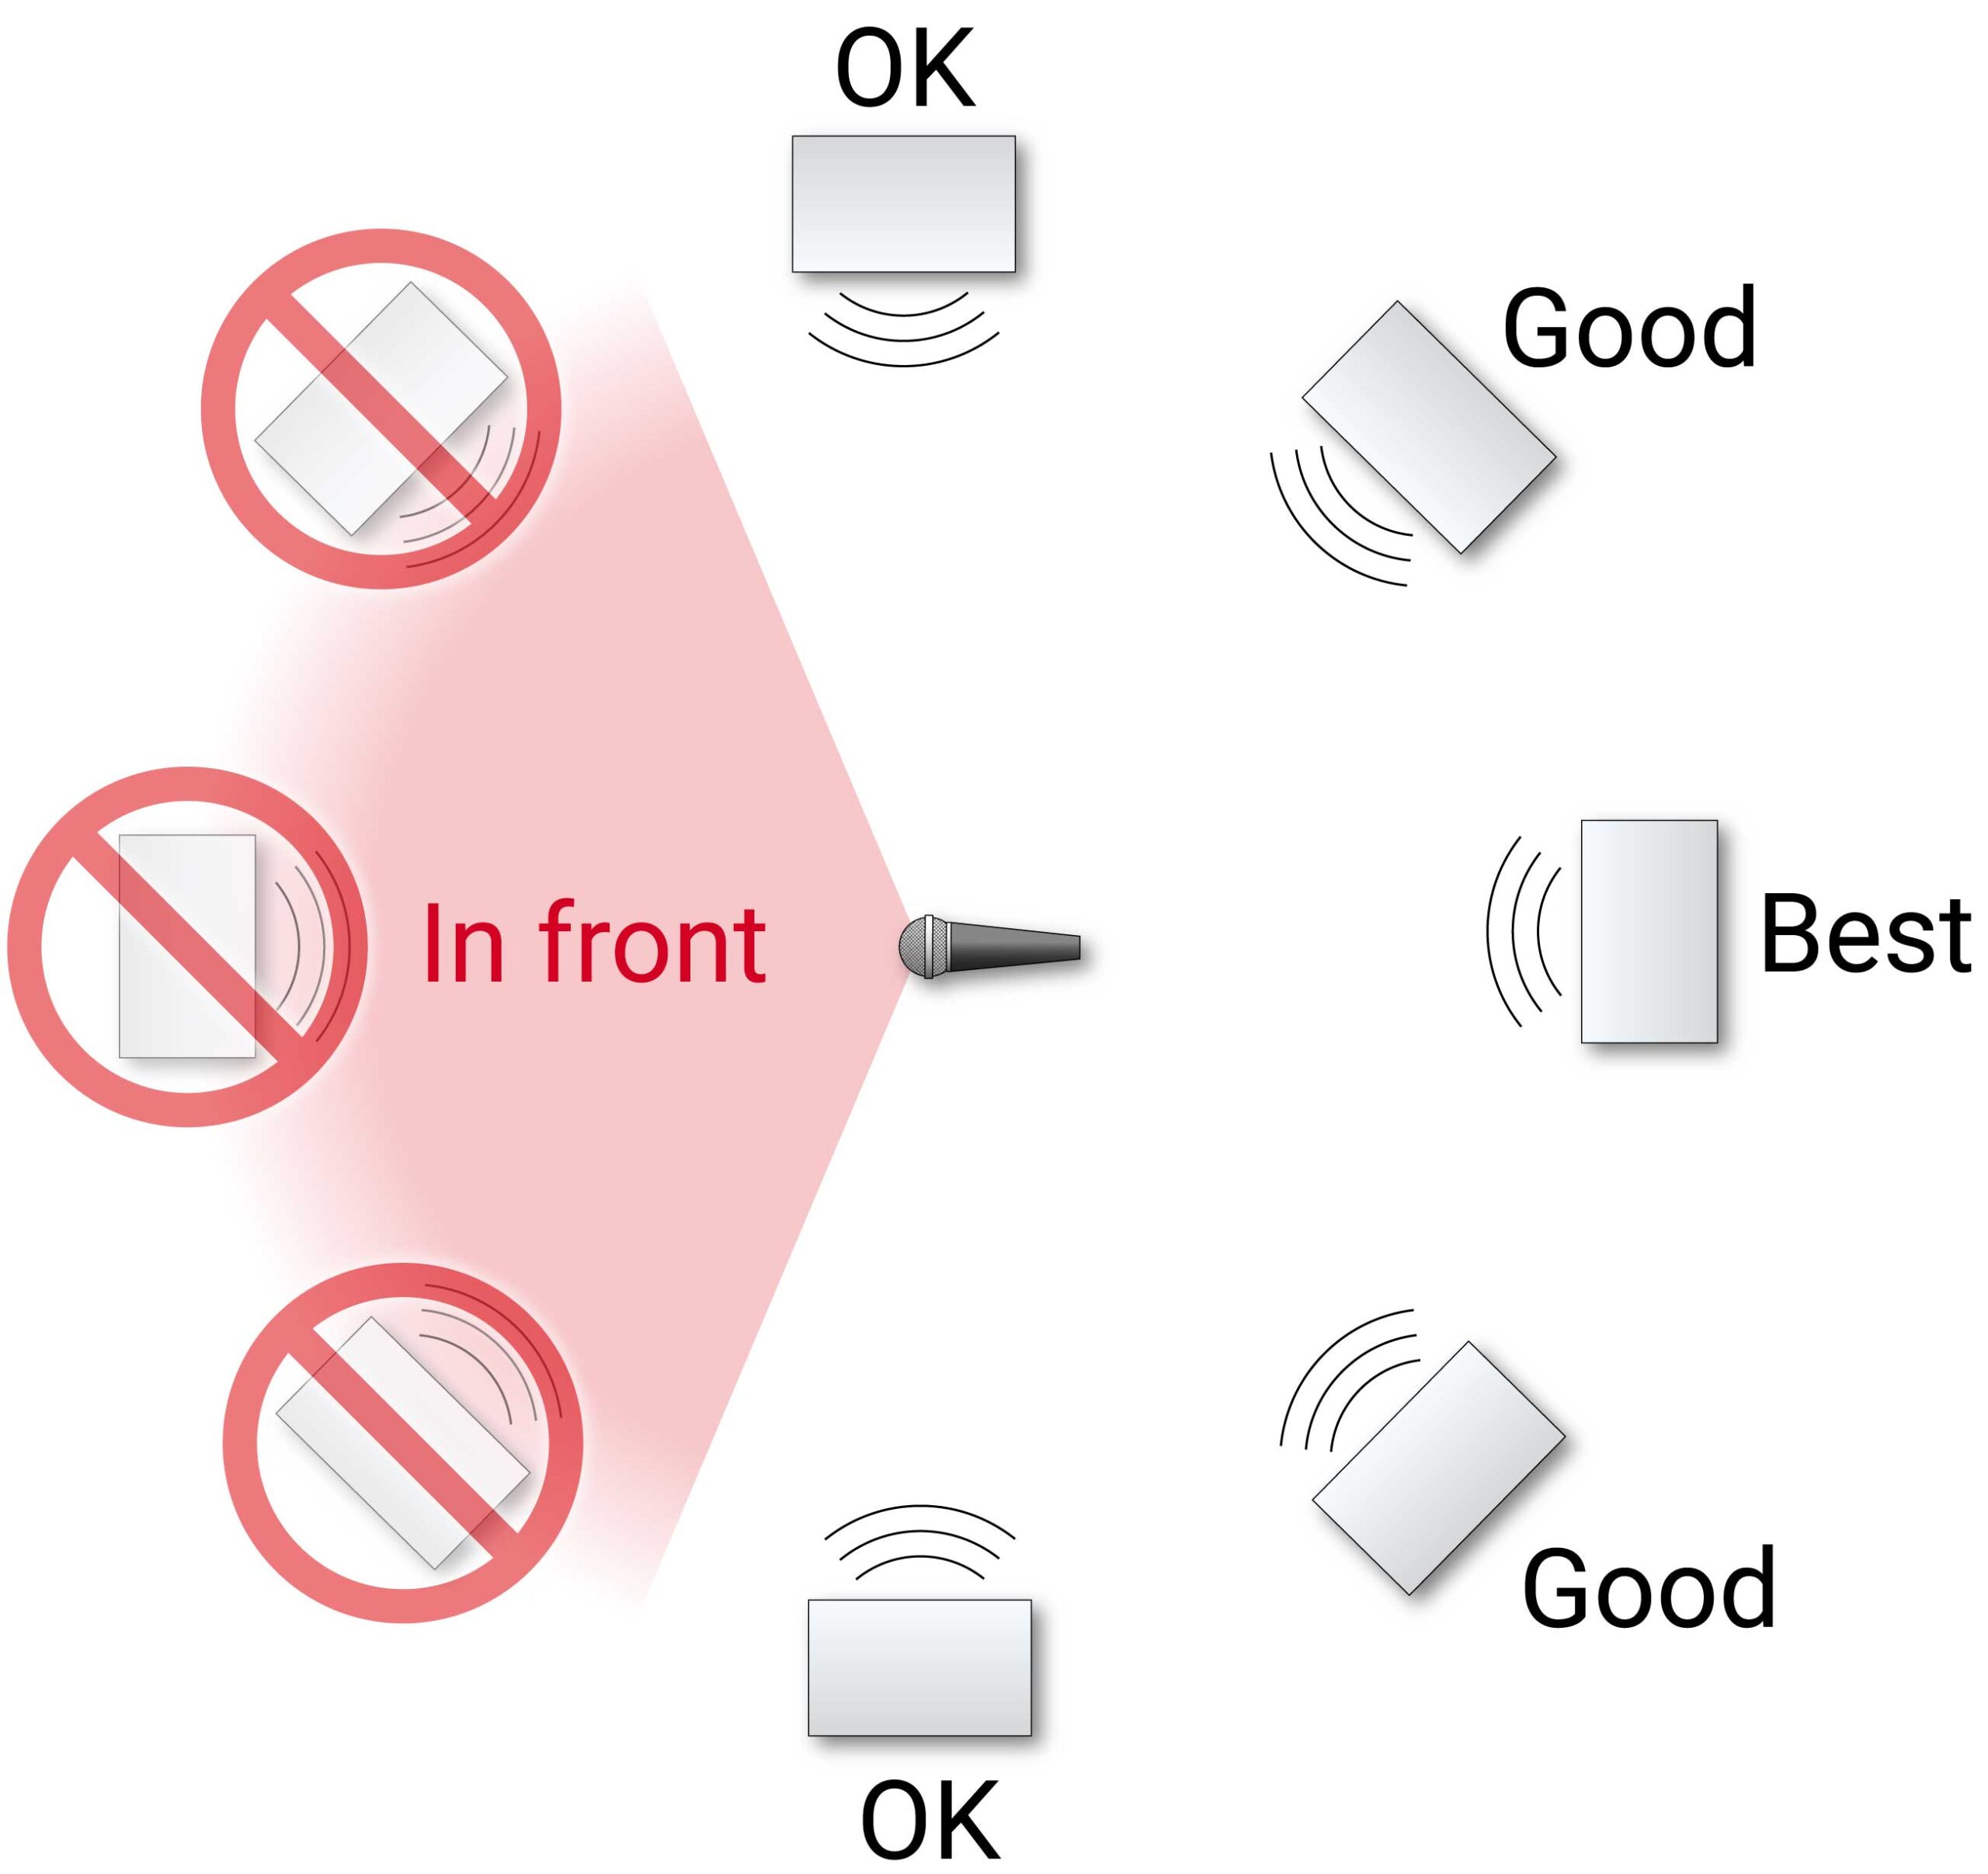
Broadcast Output
Broadcast Output enables you to output mix or multichannel audio from FarPlay to another app (typically a livestreaming app or a DAW). By using an independent buffer, this audio can be delayed to ensure the cleanest-possible audio quality, without adding latency to the audio you hear in your headphones. Available to Standard+ and FarPlay For Teachers subscribers.
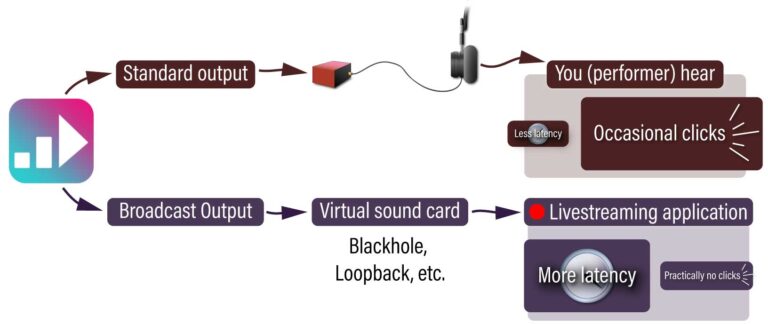
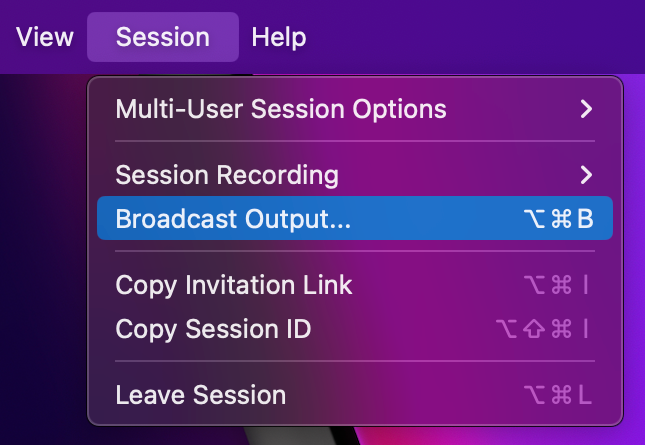 In the Broadcast Output window that appears, use the Output Device pull-down menu to select your virtual sound card.
 For step-by-step instructions, including for livestreaming, visit our Broadcast Output page.
 Fix “Failed to connect to …” error
Most users use FarPlay without making any changes to their network settings (remember to use Ethernet!). In unusual cases, you might get a “Failed to connect to …” error. If you’re using macOS Sequoia, go to your Mac’s System Settings > Privacy & Security. Choose Local Network. Click the toggle switch to give FarPlay permission.
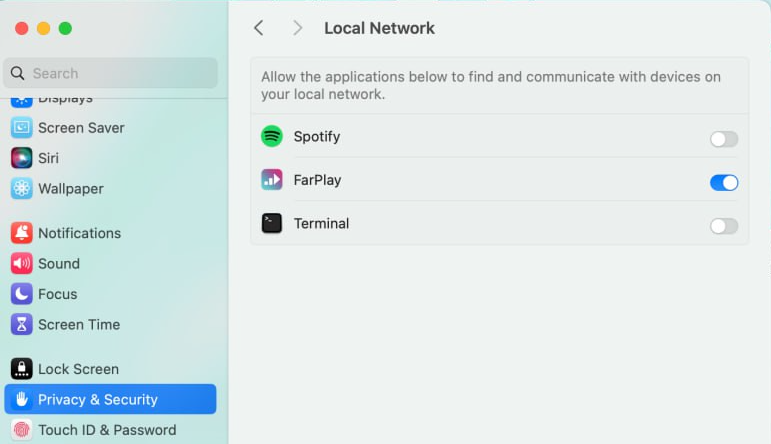
If you get a connection error while a participant is using an especially restrictive network (a university or corporate network, for example), follow our step-by-step instructions for working with restrictive firewalls.
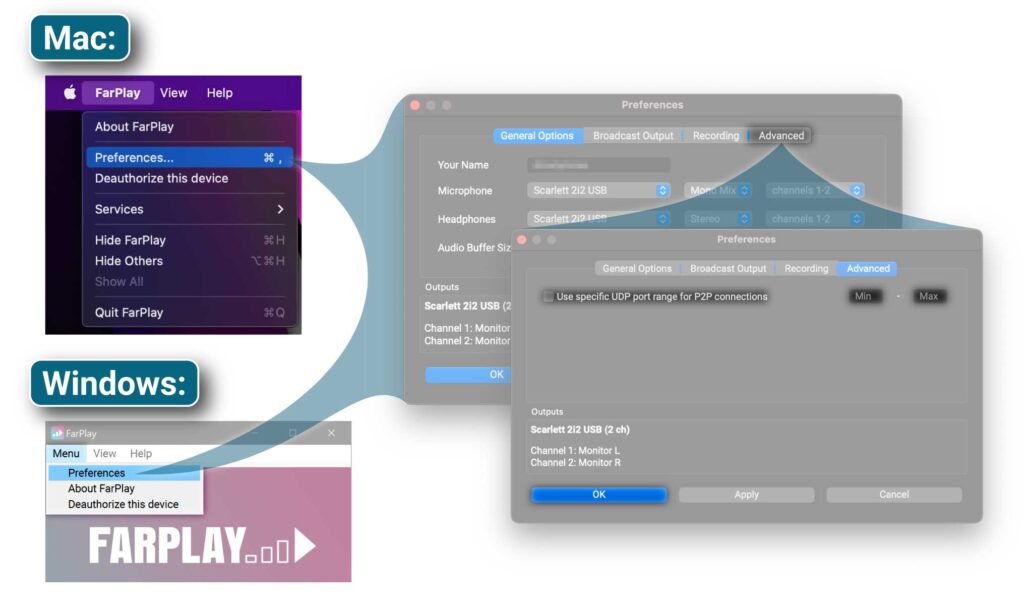
If you want FarPlay to use ports that you’ve already forwarded on your router, simply click on the FarPlay menu, choose Preferences, and then navigate to the Advanced tab. Check the checkbox to “Use specific UDP port range for P2P connections,” and use the Min and Max boxes to enter the port range forwarded on your router.
Audio limiter
FarPlay 1.2.6 introduces a limiter to prevent the input mixer, output monitor, mix recording, and broadcast output from introducing clipping. You can adjust settings for the limiter or turn it off completely.- Open FarPlay Preferences by clicking the gear
 .
. - Select the Advanced tab.

- To use the limiter, check the checkbox labeled Audio Limiter. The limiter is on by default.

- To adjust the attack time (in ms) and release time (in ms), adjust the two values in this row.
 .
.
